
How to Connect Water Softener Drain Tubing
A water softener drain tubing connection has four joints, and each has a correct version. Push the tubing fully over the barbs and clamp it over them. Support the run so it falls steadily with no kinks or low points. Never reduce the tubing size. End the line clipped above the drain with an air gap. Each shortcut causes its own failure, usually at 2 a.m. during a regeneration.
This page covers a new installation or a full replacement. If an existing line is already leaking, the diagnosis starts in why a water softener drain line leaks.
Before You Connect: Size, Length and Height
Check three numbers in your valve's manual before you cut any tubing. The first joint depends on them.
- Size. Pentair's Fleck 5600SXT manual specifies a 1/2-inch minimum residential drain line. It requires 3/4 inch where backwash flow exceeds 7 gpm or the line is longer than 20 feet. Clack gives the same figures.
- Length and height. Morton's installation manual, written for a smaller hose, says to avoid runs longer than 30 feet or more than 8 feet above the floor, and to keep the line "as short and direct as possible."
- Material. Morton notes that flexible drain hose "is not allowed in all localities," and gives a rigid option using a compression fitting and 1/2-inch tubing. Check your local code before assuming the supplied hose is acceptable.
Most drain line requirements come from these three numbers and your local code. They are covered in depth in water softener drain line requirements. This page is about making the connections.
Flexible Tubing or Rigid Pipe?
Most softeners ship with a coil of flexible tubing, and for a short run across a basement floor to a standpipe it is the easiest choice. Rigid pipe is worth the extra work in some situations:
| Situation | Flexible tubing | Rigid pipe (PVC, CPVC or copper) |
|---|---|---|
| Short run, under 10 feet, at floor level | Good choice | Unnecessary |
| Overhead run across a ceiling | Needs close support or it sags | Holds its fall between hangers |
| Run near a window, water heater or furnace flue | Embrittles or softens | Better, if the material suits the heat |
| Local code bans flexible drain hose | Not allowed | Required |
| Garage or crawl space that can freeze | Splits | Still needs protecting, but easier to insulate and drain |
A common compromise is flexible tubing for the first two feet off the valve, which lets you slide the softener out for service, then a transition to rigid pipe for the long part of the run. Make that transition with a barbed adapter and a clamp on a straight, supported section, and keep the rigid pipe at least the same inside diameter as the tubing.
If you go rigid all the way to the valve, Morton describes the method for its units. Remove the barbed drain fitting and use a compression fitting (1/4 NPT by 1/2-inch tube minimum) with 1/2-inch tubing. Other valves have their own threaded drain elbow for rigid pipe. Either way, the valve must not carry the weight of the pipe, so support rigid drain pipe close to the elbow.
Joint 1: The Valve Drain Fitting
The drain fitting on the control valve is usually an elbow. Inside it sits the drain line flow control, a small washer that limits backwash flow. That washer sets the backwash rate, not the tubing. So bigger tubing never over-flows the bed, and smaller tubing does restrict it.
Correct:
- Point the elbow at the drain. Clack's WS1 manual says its 3/4-inch drain elbow "can be rotated 180 degrees so the outlet can be orientated to the nearest drain." Rotating the elbow is better than forcing tubing into a U-turn.
- Seal threads with PTFE tape only. Fleck says PTFE plumbing tape "is the only sealant to be used on the drain fitting". Clack also says no pipe dope.
- Solder well away from it. For a copper drain line, both manuals call for at least 6 inches between solder joints and the flow control fitting, and for soldering before the fitting goes on.
The shortcut and its failure: a reducer at the elbow to fit whatever tubing was on hand. The line becomes a permanent restriction. Clack lists drain line restriction and back pressure among the causes of a softener failing to draw brine.
Joint 2: Tubing to Barb, and Choosing the Clamp
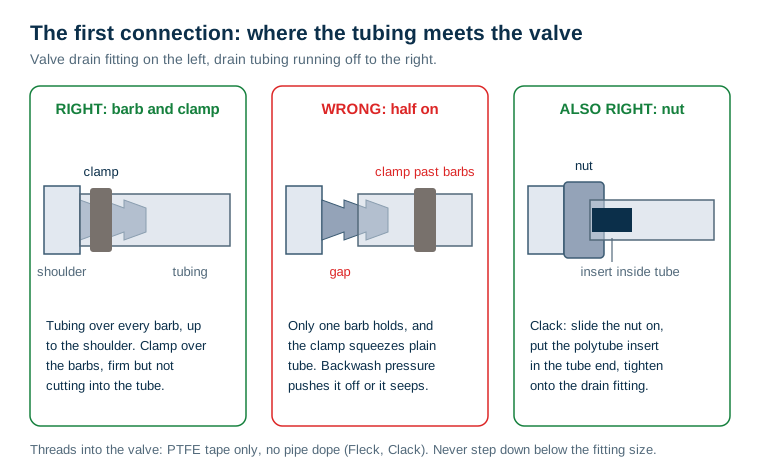
This is the joint that fails most. It is wet on one side and loaded with pressure on the other, many times a month.
Correct, on a barbed fitting:
- Cut the tubing square with a sharp knife or tube cutter. A slanted end seals only on one side.
- If the tubing is stiff, warm the end in hot tap water for a minute.
- Push it over every barb, up to the shoulder of the fitting. A slight twist helps.
- Slide the clamp on over the barbs, close to the shoulder, and tighten until the tube is gripped firmly but not cut.
Correct, on a compression fitting: Clack's elbow takes an optional nut and polytube insert for 5/8-inch flexible tubing. Slide the nut onto the tubing, put the insert into the tube end, then tighten onto the fitting. Clack notes that nut "is only designed for use with flexible polytube." Rigid tubing needs a different fitting.
Choosing the clamp:
| Clamp | Where it works | Watch for |
|---|---|---|
| Stainless worm-drive band clamp | Most barbed drain connections | Sized to the tube's outside diameter; overtightening cuts soft tubing |
| Clamp supplied by the softener maker | The fitting it came with | Use it, not a substitute |
| Constant-tension spring clamp | Tubing that softens or relaxes with temperature | Must match tube size exactly |
| Zinc-plated or mild steel clamp | Avoid | Rusts in a damp spot and loses its grip |
The shortcut and its failure: tubing pushed only halfway on, with the clamp beyond the barbs on plain tube. One barb holds against the backwash pressure. The clamp squeezes nothing useful. The line seeps, or blows off during the first backwash.
Joint 3: The Run, Its Supports and Its Bends
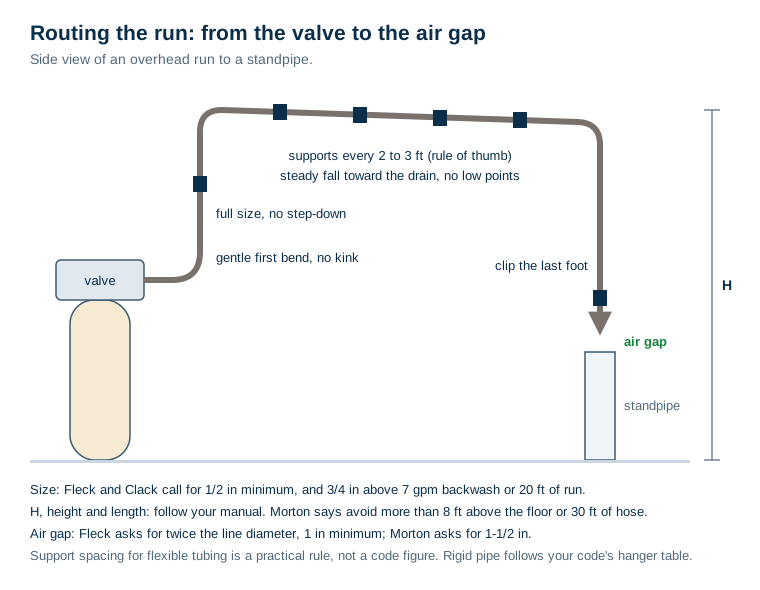
The run is not a joint in the fitting sense. But where it bends, where it is supported and where it is spliced decide whether the connections at either end stay tight.
Correct:
- A gentle first bend as the tubing leaves the valve. A kink at the first bend is both a leak point and a restriction.
- Supports every 2 to 3 feet on horizontal runs of flexible tubing, plus one close to each end and each side of a bend. That spacing is a practical rule, not a code figure. Rigid pipe follows the hanger table in your adopted plumbing code.
- A steady fall toward the drain on horizontal runs, so the line empties between regenerations and has no low points where water sits.
- Full size end to end. No reducers and no smaller tubing spliced in. A splice, where you cannot avoid one, goes on a straight, supported section with a barbed coupling and a clamp each side.
- Out of sunlight, away from heat, inside heated space. Flexible tubing embrittles in daylight, softens near flues and splits when it freezes.
The shortcut and its failure: tubing laid loose across the floor or hung in long loops. It sags, water collects in the low point, the tube stretches there, and the backwash surge moves it every cycle until a joint loosens or the wall splits.
One line only. The brine tank overflow is not part of this run. Morton says not to connect the valve drain hose to the salt tank overflow hose. The overflow is a separate gravity line that must stay lower than its fitting on the tank.
Joint 4: The Termination and the Air Gap
The last connection is deliberately not a connection. The tube end sits above the receptor with open air between them. That gap keeps drain water from ever being drawn back into the softener and the house supply.
Correct:
- Choose a receptor. Morton lists a floor drain (preferred), a laundry tub, a standpipe or a sump, subject to local code.
- Hold the end above the flood rim. Fleck requires an air gap of twice the drain line diameter, with a 1-inch minimum. Morton asks for 1-1/2 inches and says, "Do not put the end of the drain hose into the drain."
- Secure the end. Morton says to secure the drain hose to prevent "whipping" during regeneration. Clip the last foot of tubing to the standpipe, the wall or a bracket so the tube end cannot move sideways or drop.
- Consider a listed air gap fitting. Clip-on air gap devices made for softener drains hold the tube at a fixed height above a standpipe. They solve the securing problem without creating a direct connection.
The shortcut and its failure: the tube splashes during backwash, so it gets pushed down into the standpipe, taped into the drain opening, or connected to a sink tailpiece with a fitting. Each one removes the air gap and creates a direct connection between the drain and the drinking water supply. If the receptor splashes or overflows, the problem is the receptor's size or the backwash flow, and the fix belongs there. Why the gap matters, and what codes generally require, is explained in why a water softener drain needs an air gap.
Test the Water Softener Drain Tubing Connection
- Dry every joint and wrap the valve connection in paper towel.
- Start a manual regeneration and stay for the backwash stage, which usually has the highest flow.
- Watch the tube end. A steady stream into the receptor, no splash over the rim, no movement, and a visible gap.
- Walk the run. No drips, no bulging at the first bend, no sag developing between supports.
- Check the paper towel at the end of the regeneration.
- Check the clamp after a week. Flexible tubing relaxes, and a clamp that was tight on day one may need a quarter turn.
What a Good Drain Connection Cannot Fix
- Water running to drain all the time. That is a valve seal fault, not a tubing problem.
- A receptor that cannot take the flow. A standpipe or floor drain that backs up during backwash needs attention at the drain.
- Poor brine draw from other causes. A restricted drain line is one cause among several, alongside the injector and seals.
- Softening itself. The drain line carries waste away. It has no effect on hardness removal, provided it does not restrict the backwash.
Make all four joints properly the first time. Then the drain line needs little more than a glance during your annual softener check.
Frequently Asked Questions
How do you connect a drain line to a water softener?
Find the drain fitting on the control valve, usually a barbed elbow or a threaded elbow holding the drain line flow control. Push the tubing fully over the barbs to the shoulder and clamp it over the barbs. On a compression fitting, slide on the nut, put the insert in the tube end and tighten. Run the tubing with gentle bends and supports to the drain, and secure the end above the receptor with an air gap.
What size tubing is used for a water softener drain line?
Follow your valve's manual. Fleck and Clack specify a 1/2-inch minimum for residential valves, and 3/4 inch where backwash flow exceeds 7 gallons per minute or the line is longer than 20 feet. Clack's standard drain elbow takes 5/8-inch polytube or a 3/4-inch threaded connection. Some retail softeners ship with smaller hose and give their own length and height limits. Never reduce below the size of the valve's drain fitting.
Can a water softener drain line go up?
Often, yes. Backwash water leaves the valve under pressure, so many valves can push it up to an overhead run. The limits are in your manual. Morton, for example, says to avoid elevating its drain hose more than 8 feet above the floor. A line that is too long or too high can stop the softener drawing brine, so keep overhead runs as short as possible and check the limits for your valve.
Can the softener drain and brine tank overflow share a line?
No. The valve drain carries pressurized backwash water, and the brine tank overflow is a gravity line. Morton's manual says not to connect the valve drain hose to the salt storage tank overflow hose. Joined together, backwash water can push back into the brine tank. Run them separately, and keep the overflow line below its fitting on the tank.
What kind of clamp should I use on softener drain tubing?
Use a stainless steel clamp sized to the tubing's outside diameter, or the clamp your softener maker supplies. Stainless steel matters because the connection is damp and a plated clamp rusts. Place it over the barbs, not beyond them, and tighten until the tube is gripped without being cut.
How high above the drain should the softener drain line end?
Above the flood rim of the receptor, with open air between the tube end and the drain. Fleck specifies an air gap of twice the drain line diameter with a 1-inch minimum. Morton asks for 1-1/2 inches. Your local plumbing code may set its own requirement.
