
How to Install a Whole-House Water Softener
To install a water softener, shut off and drain the main, cut in a bypass on the cold line after the outdoor tap branch, and connect the inlet and outlet. Then run a drain line with an air gap, fit a separate brine overflow, and pressurize slowly through the bypass. A straightforward install takes about four hours. Most floods come from doing steps out of order, so follow the sequence below.
Each step lists the tools and parts it needs. Three steps are marked flood point: that is where a small mistake puts water on the floor.
How to Install a Water Softener: Four Checks Before You Start
Do these a week ahead, not on the day.
- Test your hardness and write it down. You need the number to program the valve. If your water carries iron or sediment, those filters go in ahead of the softener, and it is easier to plan them now.
- Check your pressure. You need a pressure gauge on a hose tap. Pentair's Fleck 5600SXT manual requires at least 20 psi for the valve to work and a maximum of 125 psi. Morton's manual adds that if daytime pressure is above 80 psi, night-time pressure may exceed the maximum, so a pressure-reducing valve comes first.
- Confirm the three utilities within reach: the main cold line, a drain (floor drain, laundry tub or standpipe), and a grounded outlet that is not on a switch. If any of the three is missing, the job gets bigger.
- Check the rules. Some jurisdictions require a permit or a licensed plumber for this work. Morton's installation manual notes that Massachusetts requires a licensed plumber and its own plumbing code (248 CMR).
Step 1: Choose the Spot and Stage the Parts
Tools: tape measure, level.
The softener goes on the main cold line after the main shutoff and after the branch to the outdoor taps, and before the water heater. Morton's installation and operation manual says to install it "close to the water supply inlet, and upstream of all other plumbing connections, except outside water pipes," and to keep it out of direct sun and freezing spaces.
Put the mineral tank and brine tank where you can reach the salt lid and the bypass, on a flat, solid floor. Do not shim under the brine tank. Morton warns the weight of a full salt tank can crack it at the shim. Level the floor area instead.
Open the box and check the parts: the bypass valve, its clips, the drain hose and clamp, the overflow elbow, and the power supply. Anything missing is better discovered now than with the water off. Online brands differ in what they ship, and some do not name every part. The SpringWell review is one example of checking a box list against the manual before install day.
Step 2: Shut Off the Water and Relieve Pressure (Flood Point 1)
Tools: bucket, towels, a flashlight.
- Close the main shutoff valve near the meter or pressure tank.
- Turn off power or gas to the water heater, so its element or burner cannot fire while the tank is losing pressure.
- Open the lowest faucet in the house and a faucet upstairs to drain the lines. Do not drain the water heater.
Flood point 1: prove the shutoff holds before you cut. Old gate valves and worn ball valves often let water past when "closed." Leave the lowest faucet open for five minutes. If it still trickles, the valve is passing water, and cutting the main will send a steady stream into the basement for as long as the job takes. Fix or replace the shutoff first, or have the utility or a plumber shut off at the curb. On a well, switch off the pump breaker as well.
Step 3: Mount the Bypass on the Valve
Tools: silicone grease (only silicone; Clack and Fleck both warn against petroleum lubricants), clean rag.
Check the valve inlet and outlet ports for debris, and make sure the meter turbine in the outlet port spins freely if yours has one. Grease the bypass O-rings lightly, push the bypass fully onto the valve and snap the clips home. Morton's manual says all the clip tabs must pass through the holes and fully into the channel, so the bypass cannot pull out under pressure.
Look at the valve body now for the IN and OUT marks or flow arrows. Morton puts it plainly: "Be sure hard water supply pipe goes to the water softener valve inlet side." Getting this backwards is the most common error that goes unnoticed. If the plumbing you are connecting to is an existing builder loop, confirm which pipe is which before you cut anything: a reversed loop is the classic hidden mistake.
Step 4: Cut the Main and Dry-Fit the Connections
Tools: tubing cutter (copper, PEX, CPVC) or hacksaw (galvanized), deburring tool, the adapters for your pipe type, pipe and fittings.
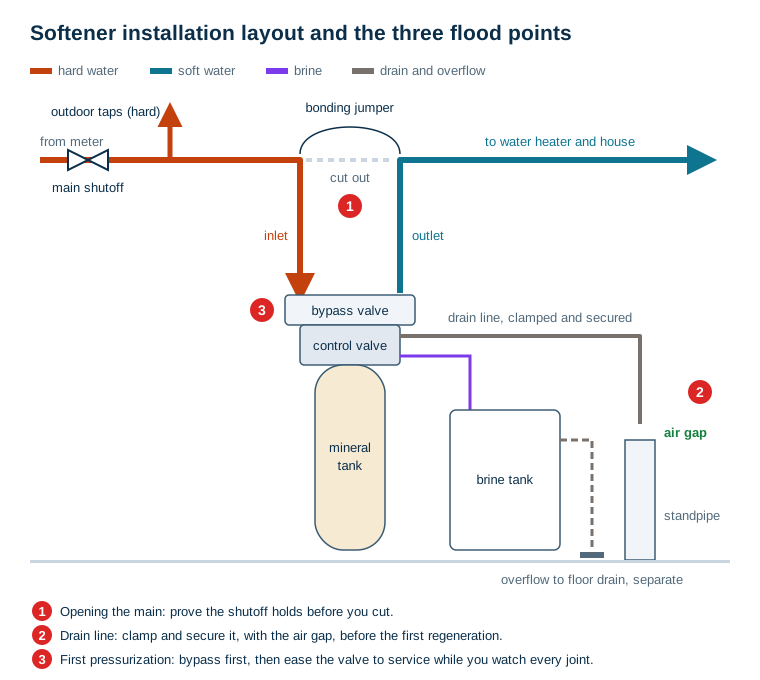
- Mark the cut so the inlet and outlet pipes will drop straight to the bypass without bending or twisting.
- Cut out the section and deburr the ends. Water left in the pipe will drain out, which is what the bucket is for.
- Measure, cut and loosely assemble everything from the main to the bypass inlet and outlet. Morton's manual asks for fittings "fully together, and pipes squared and straight."
- Support the pipe on both sides with straps or brackets. The valve fittings are not meant to carry the weight of the plumbing. Clack's manual says its fittings accept only about 2 degrees of misalignment and are "not designed to support the weight of a system or the plumbing."
The joining method depends on your pipe. Copper, PEX, CPVC and push-fit each have their own trap, and most installs need a transition from one to another. See connecting a softener to copper, PEX, CPVC and push-fit.
Step 5: Make the Joints Away From the Valve
Tools: depends on material (torch, solder and flux; PEX crimp or expansion tool; CPVC primer and cement; push-fit depth gauge).
Make every heat or solvent joint before it is attached to the plastic valve or bypass. Morton warns: "Do not solder with plumbing attached to the single bypass valve. Soldering heat will damage the plastic valve." Clack's WS1 service manual says to connect its installation fittings to the plumbing first and fit the nut, split ring and O-ring only once solder joints are cool and solvent cement has set. Both Fleck and Clack call for at least 6 inches between solder joints and the drain line flow control fitting.
On threaded connections to the valve, use PTFE tape and no pipe dope. Clack and Fleck both say this. Hand-tighten the plastic nuts; a pipe wrench cracks them.
Step 6: Restore the Electrical Ground
Tools: two ground clamps, a length of bare copper wire of the gauge your code calls for.
In many homes the metal water pipe is part of the electrical grounding. The plastic bypass and softener break that path once the main is cut. Morton says to install a #4 copper wire "across the removed section of main water pipe, securely clamping it at both ends," and to follow local plumbing and electrical codes. Clack's instruction is shorter: "Install grounding strap on metal pipes." On all-plastic plumbing there is nothing to bridge.
Step 7: Run the Drain Line (Flood Point 2)
Tools: the drain hose supplied (or tubing of the size your valve requires), a hose clamp, tubing cutter or knife, clips or straps.
- Push the tubing fully onto the valve's drain fitting and clamp it.
- Route it to the drain with gentle bends and no low points, supported along its length.
- Keep within the valve's limits. Fleck specifies a 1/2-inch minimum and 3/4 inch for runs over 20 feet. Morton says to avoid runs longer than 30 feet or more than 8 feet above the floor with its hose.
- End it above the drain with an air gap. Fleck requires twice the drain line diameter with a 1-inch minimum. Morton asks for 1-1/2 inches.
Flood point 2: secure the end. The first regeneration sends several gallons a minute down this line, often at 2 a.m. A loose end whips out of a standpipe or floor drain and soaks the floor. Morton says to secure the hose to prevent "whipping" during regenerations. Clip or strap the last foot of tubing so it cannot move, without pushing it down into the drain. The full connection detail is in how to connect water softener drain tubing.
Step 8: Fit the Brine Tank Overflow Separately
Tools: the overflow elbow and grommet, 3/8-inch tubing, clamp.
Fit the overflow elbow in the brine tank wall and run its tubing to a floor drain or other drain point lower than the elbow. It is a gravity line and only carries water if the brine tank overfills. Morton is explicit: do not connect the valve drain hose to the overflow hose. Joined together, pressurized backwash water would push back into the brine tank and out of the overflow.
Step 9: Pressurize Slowly Through the Bypass (Flood Point 3)
Tools: bucket, towels, flashlight, paper towel.
This order comes from Morton's pressure-test procedure. Do it exactly as written:
- Open two or more softened cold taps near the softener.
- Put the bypass in bypass.
- Open the main shutoff fully and run the taps until the flow is steady with no air. This also flushes out solder, flux and shavings before they reach the softener. Fleck's startup notes call the debris "usually solder."
- Move the bypass toward service slowly, pausing several times so the tank fills and air escapes. With a three-valve bypass, close the bypass valve, open the outlet valve, then open the inlet valve slowly.
- After about three minutes, run a hot tap until it flows steadily, then close all the taps.
Flood point 3: watch every joint as pressure comes up. A clip not fully seated, a dry-fitted joint that never got cemented, or a push-fit fitting not fully inserted will let go at full pressure. Wrap each new joint in paper towel and check it at 5 minutes, 30 minutes and the next morning. If a joint at the bypass leaks, shut the water off and relieve the pressure before you pull a clip. Morton warns that removing clips under pressure damages them.
Once you are sure there are no leaks, turn the water heater back on.
Step 10: Add Water, Salt and Power
Tools: bucket, salt.
Pour a few gallons of water into the brine tank, or follow your manual. Morton says about three gallons. Fleck says about an inch above the grid plate, and to add salt only after the first cycles. Then fill with the salt your manual specifies. Plug the power supply into an outlet that is not switched and program the time of day, your hardness and the regeneration time.
Step 11: Sanitize and Run the First Regeneration
Morton suggests pouring about 3 ounces of household bleach into the brine well and starting a regeneration, then running 50 gallons through a cold tap afterward. Stay with the unit during this first cycle. Watch the drain line through backwash to confirm steady flow, that the end stays put and the air gap holds. Then confirm the valve draws brine and refills the brine tank. The full commissioning sequence, with what normal looks like at each stage, is in the water softener startup procedure.
Step 12: Confirm It Softens
The next day, test a cold tap after the softener and compare it with the hose tap on the hard side. If the treated tap is not soft, check the flow direction, the bypass position and the hardness setting before anything else.
Which Parts to Hand to a Plumber
A realistic split for a competent DIYer:
| Task | DIY? | Why |
|---|---|---|
| Positioning, bypass assembly, programming, salt | Yes | No water risk, and the manual covers it |
| Push-fit or PEX connections on clean pipe | Usually | Simple tools, but the push-fit depth must be exact |
| Soldering copper near a plastic valve | Only if you already solder well | Heat damage to the valve or O-rings is not covered by the warranty |
| Cutting old galvanized pipe | Hand off | Old threads snap, and the pipe may need replacing first |
| A shutoff that will not close | Hand off | Needs a curb shutoff or a valve replacement under pressure |
| New drain line, standpipe or code questions | Hand off | Receptor sizing and the air gap are code items |
| Ground jumper | Yes, to code | Simple, but it is electrical safety; ask if unsure |
If most of your rows land in the hand-off column, buying with installation included may be simpler. Comparing Home Depot and Lowe's install terms shows what each store's package covers, and weighing a dealer-installed Culligan against a DIY Whirlpool shows what the dealer premium actually buys.
Most failed DIY installs are not bad joints. They come from skipped steps: a drain line left unsecured, a bypass opened too fast, or pipes connected backwards. The patterns are collected in common water softener installation mistakes.
What a Correct Install Still Will Not Do
- It will not treat outdoor taps. They stay hard by design, to save salt.
- It will not fix iron, sediment, sulfur or bacteria. Those need their own equipment ahead of the softener. Morton's manual says not to use the unit on water that is "microbiologically unsafe or of unknown quality" without disinfection.
- It will not correct low pressure. A softener adds a small pressure drop. If pressure is already marginal, check it before you buy.
Install in this order, check the three flood points, and the softener will be working by the end of the afternoon.
Frequently Asked Questions
Can I install a water softener myself?
Yes, if you can cut and join the pipe material in your house, locate and trust your main shutoff, and route a drain line to a proper receptor. Many owners do. Hand the job to a plumber when the main shutoff will not close fully, when the pipe is old galvanized steel, when there is no drain nearby, or when your jurisdiction requires a licensed installer or a permit. Massachusetts, for example, requires a licensed plumber according to one major manufacturer's manual.
How long does it take to install a water softener?
About four hours for a straightforward install: accessible main line, a floor drain or standpipe nearby, an outlet close by, and pipe you already know how to join. Allow a full day if you need to run a new drain line, relocate the main, add a loop or deal with old galvanized pipe.
Where does a water softener go in the plumbing?
On the main cold line after the main shutoff and after the branch that feeds outdoor taps, and before the water heater and the rest of the house. Filters that protect the softener, such as sediment or iron filters, go ahead of it. Morton's installation manual says to install the softener between the water inlet and the water heater and to leave outside faucets on hard water.
What size drain line does a water softener need?
Pentair's Fleck 5600SXT manual specifies a minimum of 1/2 inch for a residential drain line, and 3/4 inch where backwash flow is over 7 gallons per minute or the run is longer than 20 feet. Some softeners ship with smaller hose and give their own limits, so follow your valve's manual. The line must end above the drain with an air gap.
Do you need a bypass valve on a water softener?
Yes. A bypass lets you take the softener out of service for repairs or salt problems while the house still has water. Most softeners ship with a single-handle bypass that fits straight onto the valve. Otherwise you build a three-valve bypass in the pipework. Manufacturers such as Fleck say to always provide one if the unit is not equipped with it.
What do you do after installing a water softener?
Put the bypass in bypass, flush the lines, then ease it to service slowly so the tank fills and air purges. Check every joint, add water and salt to the brine tank, program the controller with your hardness, sanitize, and run a first regeneration while you watch the drain line. Then test the water at a cold tap to confirm it is soft.
