
How to Winterize a Water Softener
To winterize a water softener, first decide which case you are in. In a heated home where only the softener's space gets cold, keep it in service and keep it above 40°F. If the property will be unheated all winter, bypass it, drain both tanks, and then empty the control valve and bypass as well. A gravity drain leaves water in their passages, and those are where most freeze cracks start.
The two cases need different procedures. Draining a softener in a house that is still lived in is unnecessary work. Keeping a vacant cabin's softener "warm enough" with a small heater that fails during a power cut is how freeze cracks happen.
Two Ways to Winterize a Water Softener: Which Do You Need?
| Scenario 1: Heated home, exposed unit | Scenario 2: Property left unheated | |
|---|---|---|
| Typical location | Garage, crawl space, porch, unheated utility room | Cabin, seasonal home, vacant rental, outbuilding |
| Is anyone using water? | Yes, daily | No, for weeks or months |
| Goal | Keep it running and above 40°F | Remove every pocket of water that can freeze |
| Main risk | A cold snap, a heater failure, a frozen drain line | Water trapped in the valve, bypass and pipe loops |
| Effort | An afternoon of insulation and checks | One to two hours, plus the spring restart |
Why 40°F and not 32°F. The valve makers set the floor. Clack's WS1 service manual lists minimum and maximum operating temperatures of 40°F to 110°F. Pentair's whole-house softener spec sheet gives 40°F to 100°F for both water and ambient temperature. At 40°F you still have a margin before water freezes. At 33°F you have none.
Scenario 1: Heated Home, Exposed Unit
In this case the softener stays in service. Water moves through it every day, and your job is to keep the space warm and protect the parts that sit outside the heated air.
- Put a min/max thermometer beside the valve. Check it after the first cold night. Without a reading you are only guessing.
- Heat the space, not the unit. A thermostatically controlled heater set to keep the room above 40°F is the most reliable fix. Install and clear it as its own instructions require. In a garage, keep the door closed and seal gaps near the softener.
- Insulate the pipes in and out. Foam pipe insulation on the supply, the outlet and the bypass connections slows heat loss at the points furthest from any heat.
- Deal with the drain line. A drain line that runs through an outside wall or a cold crawl space often freezes first. When it does, the next regeneration has nowhere to send its water. Reroute it to an indoor floor drain or standpipe if you can, and keep the required air gap at the end.
- Do not wrap the control head airtight. The electronics and motor need to stay dry and ventilated. A loose insulated cover over the tank is fine. Sealing the valve and transformer in plastic is not.
- Plan for power cuts. The heater stops when the power does. If a winter outage is forecast and the space will fall below freezing, bypass the unit, shut its supply and open a downstream tap until the heat comes back.
- Relocate it if all else fails. A softener that needs a heater running every night in a garage is often worth moving inside the heated envelope when it is next serviced.
Scenario 2: Property Left Unheated
Here, insulation is not enough. Once the heat is off, every pocket of water in the system will eventually freeze. The goal is to leave no water that can.
Before you start: run a manual regeneration a day or two earlier, so the resin goes into storage freshly regenerated and rinsed. See how to manually regenerate a water softener.
- Turn off the water at the main shutoff and open a faucet to relieve pressure. GE's water softener winterizing steps start the same way.
- Put the softener in bypass. On a three-valve bypass, close the inlet and outlet valves.
- Unplug the transformer. Store it indoors if you can.
- Disconnect the softener from the plumbing at the inlet and outlet. On GE's units this means removing the large holding clips and separating the softener from the adapters or bypass.
- Drain the brine side. GE's procedure: remove the brine well cover, disconnect the brine tubing at the valve, lift the brine valve out and turn it upside down to drain it. Leave any salt and saturated brine in the tank. If the space may fall far below freezing, bail the brine tank down as well.
- Drain the mineral tank. For a one-piece cabinet unit, GE tells you to lay a 2-inch board by a floor drain, lower the softener until its rim rests on the board with the inlet and outlet over the drain, lift the bottom until all the water has run out, and leave it on its side until spring. GE warns against letting the softener's weight rest on the inlet and outlet fittings, which will break them. On a two-tank system with a separate resin tank, get help. A full resin tank is heavy, and the valve and tank neck must not take the weight.
- Empty the valve and bypass. This is the step most procedures skip. See the next section.
- Plug the openings with clean rags, as GE advises, to keep out dirt and insects, and to slow the resin drying out.
- Drain the house piping too. A softener drained into a plumbing system that is still full is only part of the job. Any loops or low points in the pipes to and from the softener need opening and draining.
- Tag it. Tape a note to the valve: "Drained [date]. Do not turn on until reconnected." Whoever arrives in spring will thank you.
The Water a Gravity Drain Leaves Behind
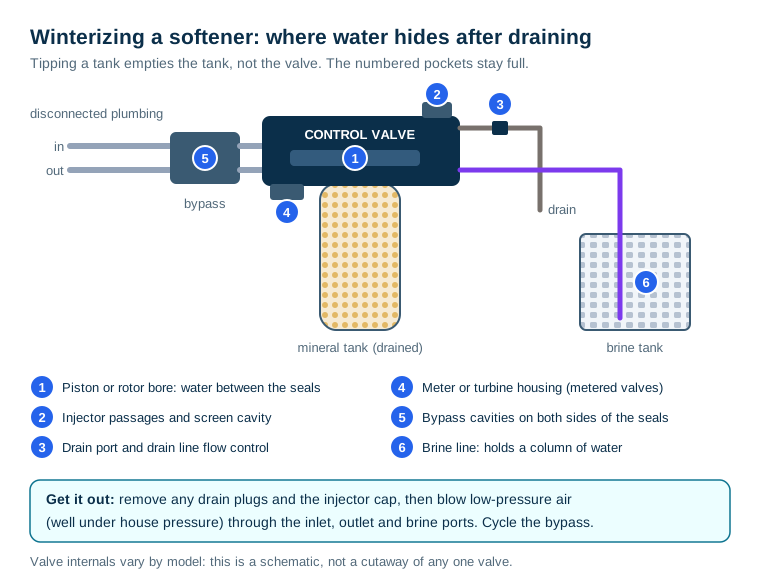
Tipping a tank empties the tank. It does not empty the control valve. A softener valve is a block of small chambers and ports, and several of them sit where gravity cannot reach them:
- The piston or rotor bore and the chambers around it, which hold water between the seals.
- Injector passages and the injector screen cavity. Some valves have a separate injector cap that can be removed to let them drain.
- The drain port and drain line flow control, sitting at the end of a small, often uphill route.
- The meter or turbine housing on metered valves.
- The bypass valve, whose internal cavities trap water on both sides of the seals, even with the handle in bypass.
- The brine line, which dips into the tank and holds a column of water.
Getting it out:
- Remove what is designed to come off. Home inspection reference InspectApedia's winterizing guide notes that many modern control valves have drain plugs that must be removed to avoid freeze damage. Take off any drain plugs and the injector cap if your manual shows them, and store the parts in a labelled bag.
- Blow the passages out with low-pressure air. InspectApedia describes forcing air into the brine tube toward the mineral tank. A hand pump or a compressor turned well down works. Keep the pressure low, well under normal house pressure, and blow through the inlet, outlet and brine ports in turn until only air comes out.
- Cycle the bypass a few times with the unit disconnected, so water trapped behind its seals can escape.
- Leave the drained bypass in its middle or bypass position, as your manual shows, rather than forcing it to an end stop.
Why this matters more than the tanks. A mineral tank that freezes has room around the resin, and a plastic tank flexes a little. A valve passage has neither: a small pocket of ice in a rigid plastic body with nowhere to expand. The freeze cracks that are hardest to find, and most expensive to fix, are in these parts. What to do if a water softener freezes lists them and explains how to pressure test for them.
Why Not Antifreeze
InspectApedia is blunt: "DO NOT POUR ANTIFREEZE or anything else that could be toxic into equipment that is treating the building water supply." That includes RV antifreeze, which is sold for plumbing systems but is not what your resin should be soaking in until spring.
The resin makers' own lay-up method uses salt instead. DuPont's storage guidance for ion exchange resins recommends storing inactive systems in a 10% sodium chloride solution. That limits biological growth, and "the concentrated brine solution will prevent freezing". That is an industrial procedure for a vessel filled so no air remains, not a home routine. It does explain why brine left in the brine tank is the least of your freeze worries.
Keep the Resin From Drying Out
The same DuPont document has a warning that most winterizing guides miss. Resin left exposed to air will "dry out and shrink", and when it is rehydrated it is "susceptible to bead breakage due to rapid re-swelling".
A drained resin tank still holds moist resin, and a closed, plugged tank loses that moisture slowly. What you want to avoid is a tank left open to dry air for months. So:
- Plug the openings once the tank is drained.
- Do not leave the valve off an open tank all winter.
- In spring, fill the tank slowly so the bed rewets gradually rather than in a rush.
Spring Restart
- Wait until the space is reliably above freezing. Clack and Fleck both say to let a valve that has been cold reach room temperature before running water through it.
- Refit drain plugs, the injector cap and the brine valve. Check each O-ring for flat spots or cracks.
- Reconnect the plumbing with the bypass in bypass, turn on the main supply, and check the bypass for leaks.
- Move the bypass to service slowly and let the tank fill, with a cold tap open nearby to purge the air.
- Add a few inches of water to the brine tank if you drained it, then add salt.
- Plug in the control, set the time and check the settings. A long power-off period can lose the time of day; if the settings are gone as well, see water softener keeps losing settings.
- Run a manual regeneration and stay with it. Check each step for leaks at the valve, collar and drain line. Cracks from a winterizing that missed a spot show up here.
- Test for hardness after the second regeneration, and confirm the bypass is really passing water through the softener. Testing a water softener bypass valve covers that check.
What Winterizing Will Not Do
Winterizing protects the softener from ice. It does nothing for the rest of the house plumbing, the water heater or a well pump, and each of those needs its own plan. It will not protect a unit that was drained but left connected to plumbing that is still full and pressurised. And it cannot undo damage from an earlier freeze. If the unit already froze once, pressure test it in spring before trusting it through another season.
Frequently Asked Questions
Do I need to winterize my water softener?
Only if it is in a space that can drop below freezing. A softener in a heated basement or utility room needs nothing. One in a garage, crawl space, outbuilding or seasonal home does. Valve makers set a floor well above freezing: Clack rates its WS1 valve for 40°F to 110°F, and Pentair's softener spec sheet lists 40°F as the minimum ambient and water temperature.
At what temperature will a water softener freeze?
The water in the control valve, bypass, resin tank and pipes is ordinary water, so it can freeze once it drops to 32°F. The brine tank is safer because saturated brine freezes at a much lower temperature than fresh water. In practice, a unit in a space where the air stays below freezing for a night or more is at real risk, and the manufacturers ask you to keep it at 40°F or above.
Should I drain my water softener for winter?
Drain it only if the space will be left unheated. If the home stays heated and only the softener's corner is cold, keep it running and keep it warm, because a unit in service has moving water and the room can be heated. If the property will sit unheated, drain it completely, including the valve passages and bypass, not just the tanks.
Can I put RV antifreeze in my water softener?
No. The softener is part of your drinking water supply, and anything poured in ends up in the resin and the plumbing. Home inspection reference InspectApedia warns specifically against pouring antifreeze or anything else that could be toxic into water treatment equipment. Drain the unit instead. Brine left in the brine tank already resists freezing far better than fresh water.
Can a water softener be kept in an unheated garage?
Only in a climate where the garage never freezes, or with protection. Fleck's service manual states the unit cannot be subjected to freezing conditions. In a garage that freezes, either keep the space above 40°F with a thermostatically controlled heater, or relocate the softener inside the heated envelope.
How do I restart a water softener after winter?
Reconnect it with the bypass in bypass, restore the main supply, then move the bypass to service slowly with a cold tap open to purge air. Refit the brine valve, add a few inches of water to the brine tank if it was drained, add salt and plug the control in. Reset the time of day and run a manual regeneration. Stay with it and check each step for leaks, then test the water for hardness after the second regeneration.
