
What to Do if a Water Softener Freezes
A frozen water softener needs three things, in order. First, isolate it: bypass or main shutoff, and unplug it. Second, let it thaw slowly at room temperature with no direct heat on the plastic valve. Third, bring pressure back in stages while you check the valve body, bypass and tank neck. Freeze cracks in those parts stay dry until pressure returns, so a unit that looks fine is not yet proven fine.
Ice itself stops nothing from leaking. The expansion that cracks a part happens during the freeze. The leak waits until the part thaws and is under pressure again, which is why the order below matters.
The First Ten Minutes: Isolate and Unplug
- Try the bypass gently. If the handle or knob moves normally, put the softener in bypass. If it resists, stop. A plastic bypass full of ice can snap before the ice gives. Close the main water shutoff instead.
- Unplug the control valve. Plugged in, a demand or timed control may try to start a regeneration. Its motor would then be driving a piston that is locked in ice.
- Open a cold tap downstream once the supply is off, so that when things thaw no part of the system is under pressure.
- Look for ice outside the unit too. Drain lines that run to an outside wall or through a cold crawl space freeze first. A frozen drain line means the next regeneration has nowhere to send its water.
- Photograph the unit and the room thermometer, if you have one. It helps with any later claim and records how cold it got.
What not to do: do not run water through it "to see if it works", and do not start a manual regeneration. The Fleck 5600SXT service manual says the unit "cannot be subjected to freezing conditions" and that in cold weather the installer "should warm the valve to room temperature before operating". Clack's WS1 service manual is just as direct: if a valve has been exposed to freezing, "let valve warm up to room temperature before running water through it."
How to Thaw a Frozen Water Softener
The goal is to bring the whole unit up to room temperature together.
Warm the space, not the part. Close the garage door, open the door between the heated house and the room, or add a space heater aimed into the room. Keep the heater well clear of the softener and anything combustible, as its own instructions require. Clack rates its valve for operation between 40°F and 110°F. Get the room back above the low end of that range and keep it there.
Why not a heat gun, torch or hair dryer on the valve? Two reasons:
- Plastic softens. Softener valve bodies, bypasses and tank necks are plastic or glass-filled plastic, and concentrated heat distorts sealing faces.
- Uneven thaw. Heat one side of a valve and the ice there melts. The water it releases is trapped behind ice still frozen elsewhere in the passage. The pressure of that trapped pocket is the same force that cracked the part in the first place.
Give it time. Hours, not minutes. The mineral tank holds a lot of water, and the valve sits on top of that cold mass. Wait until the valve, the bypass and the upper part of the tank all feel like room temperature to your hand.
The brine tank is the least of your worries. It is not under pressure, and saturated brine freezes at a much lower temperature than plain water. The brine line and the brine valve assembly can still hold plain refill water, so check them too.
Where Freeze Cracks Hide
Work through this list with a flashlight and a dry paper towel before any pressure goes back in. Then use it again during the pressure test.
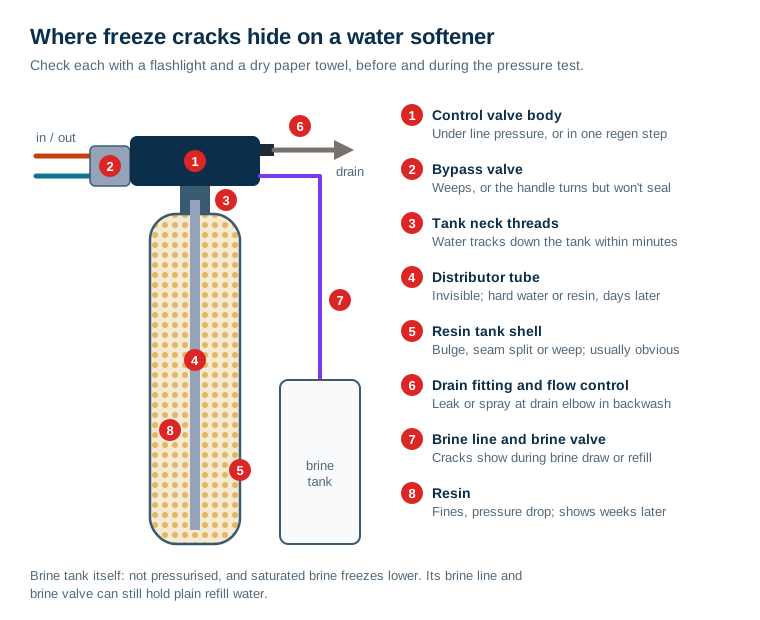
| Component | Why it is vulnerable | What a crack looks like | When it usually shows |
|---|---|---|---|
| Control valve body | Small passages hold water after every cycle | Fine straight or branching line on a flat face or corner, often away from any seam | Under line pressure, or only in one regeneration position |
| Bypass valve | Water trapped in its cavities with nowhere to go | Weep at the body, or a handle that turns but no longer seals | In service, or when switched to bypass |
| Tank neck threads | Valve and tank thread meet at a thin section | Water tracking down the tank from under the valve collar | Within minutes of pressure returning |
| Distributor tube | Thin-wall plastic inside a full tank | No visible sign; hard water afterwards, or resin at taps | Days later |
| Resin tank shell | Large body of water expanding | Bulge, seam split or weep low on the tank | Usually obvious at once, if it happened |
| Drain line fitting and flow control | Small parts at the end of a cold run | Leak or spray at the drain elbow during backwash | Only during regeneration |
| Brine line and brine valve | Plain water left from the last refill | Crack in the tubing or a split valve body | During brine draw or refill |
| Resin | Beads can fracture over freeze-thaw cycles | Fines in the drain water, pressure drop through the unit | Weeks later |
On resin, DuPont's storage guidance for ion exchange resins is plain: in tests of repeated freeze-thaw cycles "bead damage can occur", and frozen resin "should be thawed out completely under room temperature conditions" before use.
How to tell a freeze crack from a worn seal, side by side, is covered in why a water softener leaks at the control head. The short version: a seal leaks at a round joint and a new seal fixes it; a freeze crack starts on a flat face and a new seal does not.
The Staged Pressure Test
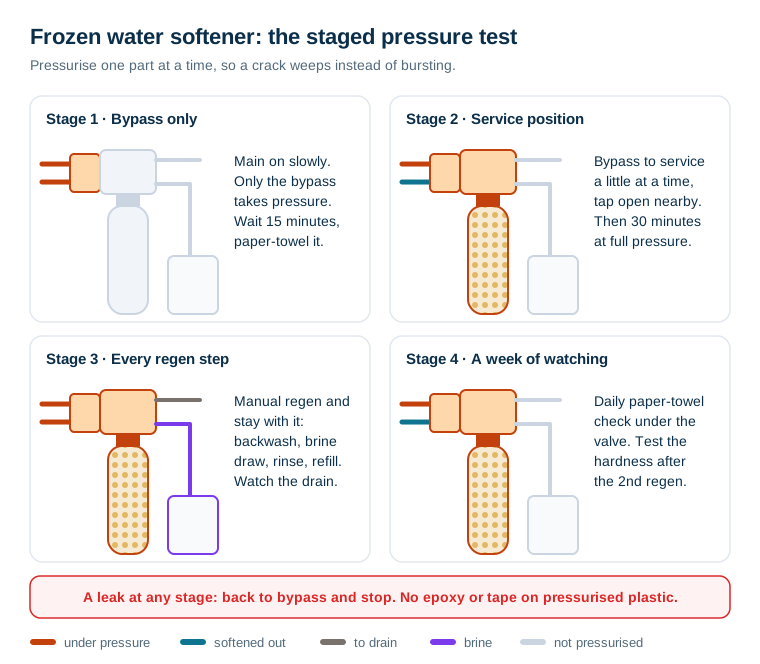
The point is to pressurise one part of the system at a time, so a crack shows as a weep rather than a burst.
Stage 1: Bypass only. With the softener still in bypass, turn the main supply back on slowly. The house gets water and the bypass body takes pressure. Dry everything and wait 15 minutes. Wrap a dry paper towel around the bypass and its connections; any damp spot is a leak. Checking whether the bypass is really diverting, rather than just not leaking, is covered in how to test a water softener bypass valve.
Stage 2: Service position. Move the bypass to service a little at a time and let the tank fill slowly, with a cold tap open nearby to push out air. Then close the tap and let the unit sit at full pressure for 30 minutes. Paper-towel the valve body, the collar where the valve meets the tank, the inlet and outlet, and the tank below the neck.
Stage 3: Every regeneration position. Plug the control back in and start a manual regeneration. Stay with it and pause in each step if your control allows: backwash, brine draw, rinse, refill. Each position sends water through different passages in the valve. A crack in a passage used only during backwash stays dry in service and leaks only in backwash. Watch the drain line outlet too, and check that the brine level falls during brine draw.
Stage 4: A week of watching. Put a dry paper towel under the valve and look at it daily. Test hardness after the second regeneration. Hard water with no visible leak points to an internal crack, often the distributor tube or a cracked internal wall in the valve.
If any stage leaks, stop there. Put the unit back in bypass and decide on repair before going further. Do not try to seal a cracked pressurised plastic part with epoxy or tape. It sits at full house pressure around the clock.
Repair or Replace: The Decision Point
| What failed | Usual fix | Rough scale of the job |
|---|---|---|
| Bypass valve only | Replace the bypass | Small part, simple swap |
| Brine line or brine valve | Replace the part | Small part, simple swap |
| Drain fitting or flow control | Replace the fitting | Small part |
| Control valve body | New control valve, or valve plus powerhead | The largest single part; see servicing a water softener control valve |
| Tank neck or tank shell | New tank and a full rebed | Tank, resin and labour |
| Valve and tank | Price a complete new softener | Often only the brine tank is left to reuse |
| Resin shedding fines | Rebed | Resin and labour |
The deciding question: after you add up the parts that failed, what is left of the original unit? If the valve and tank both cracked, the brine tank is about all that survives, and a whole new softener usually costs little more than the parts.
Age matters too. A valve body is not worth replacing on an old unit that also has worn resin. A cracked bypass on an otherwise sound three-year-old softener is a cheap repair.
What Freeze Damage Does to Warranty Coverage
Plan on paying for a freeze repair yourself.
- Clack, which makes control valves used by many softener brands, excludes "damage caused by fire, acts of God, freezing or hot water or similar causes" from its valve warranty. For outdoor installations not under cover, its weather cover must be used for the warranty to be valid.
- Fleck says in its manual that the unit "cannot be subjected to freezing conditions" and that installation is "for dry locations only".
Your softener brand's own warranty is the one that applies to you, and its wording may differ, so read it. But with the valve makers ruling freezing out, most dealers will treat a split valve body as installation-environment damage, not a defect. Whether a homeowner's policy covers the unit or the water damage is a question for your insurer.
Making Sure It Is the Last Time
Thawing and testing gets you through this winter. If the softener stays where it froze, the same thing will happen at the next cold snap. Either the space needs to stay above freezing, or the unit needs a proper drain-down before cold weather. A gravity drain leaves water in the valve passages, which is where most freeze cracks start. How to winterize a water softener covers both approaches: keeping an exposed unit warm in a heated home, and fully draining one in a property left unheated.
Frequently Asked Questions
How do I thaw a frozen water softener?
Put the softener in bypass if the handle moves freely, or close the main water shutoff if it does not. Unplug the control. Then warm the room, not the valve: close the garage door, open a door to the heated house, or run a space heater aimed at the room and kept well clear of the unit. Never use a torch, heat gun or open flame on a plastic valve. Both Fleck and Clack tell you to let a valve warm to room temperature before water runs through it.
Will my water softener work after it freezes?
Often, yes. Plenty of units come through a light freeze undamaged. But a freeze crack in a plastic valve body, bypass or tank neck does not leak while the water is frozen and often does not leak until pressure returns. Only a staged pressure test and a full regeneration cycle will show whether yours survived. Treat it as damaged until it passes.
Can I use a hair dryer to thaw my water softener?
Using it to warm the air in the room is acceptable. Aiming it at the valve is not a good idea. Concentrated heat softens plastic and thaws one part of the valve before the next, so trapped ice can still split a passage. Slow, even warming of the whole unit to room temperature is what the valve makers call for.
Does freezing damage water softener resin?
It can. DuPont's guidance on storing ion exchange resin says that in tests of repeated freeze-thaw cycles, bead damage can occur, and that frozen resin should be thawed completely at room temperature before use. A single freeze in a tank full of water often does less harm than repeated cycles, but check the resin afterwards for fines, broken beads and a drop in pressure through the unit.
Is freeze damage covered by the water softener warranty?
Usually not. Clack's limited warranty on its control valves excludes damage caused by freezing, and Fleck's manual states the unit cannot be subjected to freezing conditions. The softener brand's own warranty wording controls, so read it, but expect a cracked valve or tank from freezing to be a paid repair.
Should I replace a water softener that froze?
Replace only what cracked. A bypass valve or a brine line is a cheap part. A cracked valve body normally means a new control valve, and a cracked tank neck means a new tank and resin. If both the valve and the tank are damaged, you are buying most of a new softener, and replacing the whole unit is usually the better value.
