
Brine Tank Overflow Line Requirements
A brine tank overflow line is a separate gravity drain from the overflow elbow on the side of the brine tank. It must fall continuously, end at a drain at least 3 inches below the bottom of the fitting, finish with its own air gap, and never be connected to the softener's valve drain line. That separation is the rule most often broken.
Here is why the separation matters, and how to route the line so it works on the one night you need it.
What the Overflow Line Is For
A brine tank has two defences against overfilling:
- The safety float inside the brine well, which shuts off refill if the water rises too high. How it works, and how it fails, is in brine tank internals: float, safety float and brine well.
- The overflow fitting near the top of the tank, which lets water out before it reaches the lid.
The overflow is the backup to the backup. Water-Right's manual explains it this way: the safety float "greatly reduces the chance of an accidental brine overflow. In the event of a malfunction, however, an overflow line connection will direct the 'overflow' to the drain instead of spilling on the floor where it could cause considerable damage" (Water-Right Impression manual).
That only works if the line is connected, runs downhill and ends somewhere that can take the water. An elbow with nothing attached, or a tube that ends on the floor behind the tank, protects nothing.
Brine Tank Overflow Line Requirements in the Manuals
Two manuals spell the rules out in detail. They agree on every point that matters.
| Requirement | WaterBoss | Water-Right Impression |
|---|---|---|
| Type of line | "It is a gravity line and cannot be run overhead" | "The overflow line is a gravity drain and cannot run higher than the initial drain point" |
| Height | Must end at a drain "at least 3 inches lower than the bottom of the overflow fitting" | "Do not elevate overflow line higher than 3 inches below bottom of overflow fitting" |
| Separation from the valve drain | "Do not connect the drain and the overflow (gravity drain) together" | "Do not connect this tube into the drain line of the control valve" |
| Route | Gravity drain on the salt storage cabinet | "A direct, separate line from overflow fitting to drain, sewer, or tub" |
| Tubing | Not stated | 1/2 in inside diameter |
| Termination | Not stated | "Allow an air gap as per the drain line instructions" |
Sources: WaterBoss installation manual and the Water-Right Impression owner's manual. Water-Right's drain line instructions set that air gap at 1-1/2 inches or twice the pipe diameter, whichever is greater.
Water-Right also says the unit and its connections, "including the drain and overflow lines," must never be exposed to temperatures under 33°F. A frozen overflow is a blocked overflow.
Why the Overflow Must Never Be Tied Into the Drain Line
This is the most common installation error with overflow lines, and it looks sensible. There are two tubes going to the same floor drain, so why not join them with a tee and run one tube? Because the two lines work in completely different ways, and joining them defeats both.
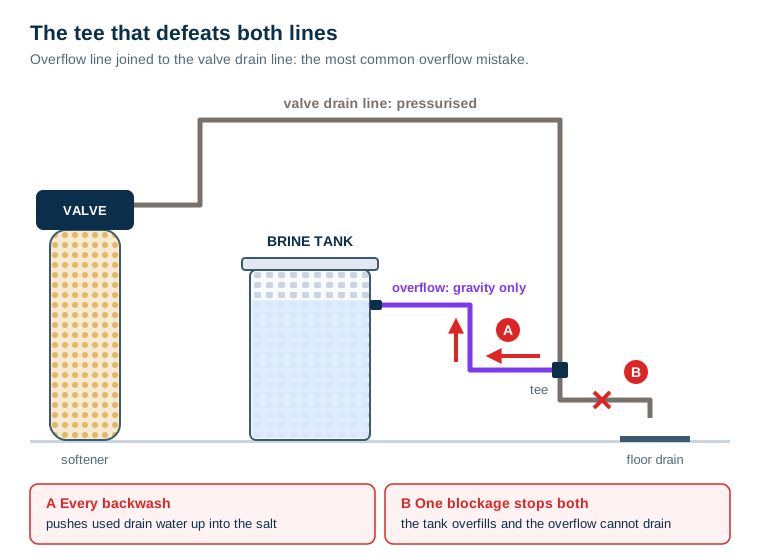
The drain line is pressurised. The overflow is not. During backwash and rinse, the control valve pushes water out through its drain line at several gallons a minute. The overflow line only ever carries water that trickles out of the tank under gravity. Tee them together and the pressurised flow does not politely pass the junction. Some of it takes the easier path, up the overflow tube and into the brine tank. That adds water the tank was never meant to hold, and it is used backwash water.
A blocked drain disables both. Now look at the failure the overflow exists for. One of the more common reasons a brine tank overfills is a valve that cannot draw brine, and Clack's troubleshooting table lists "drain line restriction or debris cause excess back pressure" and "drain line too long or too high" among the causes of a valve failing to draw regenerant (Clack WS1 service manual). The tank then keeps being refilled but not emptied. If the overflow is teed into that same restricted drain line, the water rising in the tank meets the blockage too. The backup fails for the same reason the primary did. Engineers call that a common-mode failure.
The result is the flood the overflow was installed to prevent, plus drain water pushed back into the salt. That is why both manuals insist on a separate line.
If you already have a flooded or overfull tank, the diagnosis order is in why the brine tank is full of water or overflowing.
Correct Height, Fall and Termination
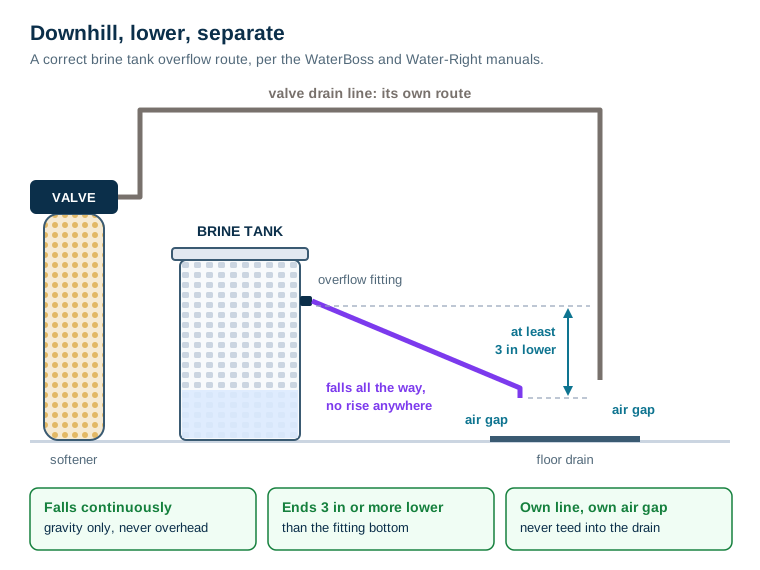
Five rules cover it:
- Start at the overflow elbow, a barbed fitting on the side of the tank below the lid. Push the tube fully onto the barb and clamp it if the fitting is designed for a clamp.
- Fall continuously. No section of the tube may rise, even briefly. A loop over a box or a sag followed by a rise creates a point the water has to climb, and gravity will not do it.
- End at least 3 inches below the bottom of the overflow fitting. That is the figure both manuals use. More fall is better.
- Terminate with its own air gap above the receptor rim: a floor drain, a laundry tub or a standpipe that is low enough. Hold the end so it cannot slip down into the drain.
- Keep it separate from the valve drain line all the way. The valve drain has its own size, lift and air gap rules, covered in water softener drain line requirements. Both tubes can end at the same floor drain or tub, each with its own air gap, as long as the receptor can take the backwash flow. They must not join before they get there.
Tubing. Water-Right specifies 1/2-inch inside diameter tubing. It needs no great capacity: refill flow on many residential valves is limited by a small flow control, and Water-Right's parts list, for example, shows a safety brine valve with a 0.5 gpm flow control. What the tube must not do is kink, sag into a trap that holds water, or pop off its fitting.
When the Only Drain Is Higher Than the Overflow
This is the situation that drives most bad overflow routing. The softener drain line can climb to a laundry tub or standpipe because it is pressurised. The overflow cannot. If there is no receptor at least 3 inches below the overflow fitting, you have four honest options:
- Use a floor drain, if there is one that connects to the sanitary sewer. Where the softener's own drain may go is covered in where can a water softener drain.
- Route the overflow into a drain pump basin at floor level, with its own air gap, if the softener already drains to one. The pump then lifts it.
- Move the softener and brine tank to where a low receptor exists, rather than forcing the overflow uphill.
- Add a leak alarm or an automatic shutoff on the softener supply as a separate layer, especially where the overflow has nowhere good to go.
What does not work: running the overflow uphill to the standpipe the drain line uses, or teeing it into that drain line. Both leave you with an overflow that cannot flow.
Check Your Own Overflow Line in Five Minutes
- Find the overflow elbow on the side of the brine tank. Is anything attached to it?
- Follow the tube to its end. Is it downhill the whole way, with no loops or climbs?
- Check the end height. Is it at least 3 inches below the bottom of the elbow?
- Check for a tee. Does the tube join the valve drain line anywhere? If so, separate them.
- Check the end itself. Is there an air gap above the receptor, and is the end held in place?
To test it, pull the tube off the elbow, hold it at the elbow's height and pour a cup of water in through a funnel. It should arrive at the drain quickly with nothing backing up. Then refit the tube.
What the Overflow Line Does Not Do
- It does not fix the cause. Water leaving through the overflow means something upstream failed: the injector, the brine valve, the safety float or the control valve. Bypass the softener and diagnose it.
- It does not save the salt. A running overflow carries brine to drain. You will notice it in the salt use before you notice it anywhere else.
- It does not protect against other leaks. A split mineral tank, a leaking bypass valve or a failed connection at the control head drains nowhere near the overflow elbow.
- It does not replace the safety float. It is the second line of defence, not the first.
A brine tank overflow line costs a few feet of tubing and five minutes. Run it downhill, keep it apart from the drain line, leave it an air gap, and it will quietly do its job on the night everything else fails.
Frequently Asked Questions
Does a brine tank overflow need to be connected?
It is strongly recommended wherever an overflow would cause damage, and most basement or finished-floor installs qualify. Water-Right's manual recommends an overflow drain line where a brine overflow could damage furnishings or the building structure, because the safety float can still fail. An open overflow elbow with nothing attached simply lets the water out onto the floor.
Can the brine tank overflow connect to the softener drain line?
No. WaterBoss says not to connect the drain and the overflow together, and Water-Right says the overflow must not be connected into the drain line of the control valve and must be a direct, separate line to the drain. The valve drain carries water under pressure during regeneration, so a joined line can push drain water into the brine tank, and a blocked drain disables both.
How high can the brine tank overflow line go?
It cannot go up at all. The overflow is a gravity line. WaterBoss says it must end at a drain at least 3 inches lower than the bottom of the overflow fitting and cannot be run overhead. Water-Right says not to elevate it higher than 3 inches below the bottom of the fitting and that it cannot run higher than the initial drain point.
What size tubing is used for a brine tank overflow?
Water-Right's manual specifies 1/2 inch inside diameter tubing from the overflow fitting to the drain. Check the fitting on your own tank and your manual; use tubing that fits the barb snugly and does not kink at the first bend.
Why is water coming out of my brine tank overflow?
Because the tank filled above its normal level: the injector is not drawing brine, the brine valve or safety float is not shutting off, or the control valve is stuck in a refill or regeneration position. The overflow is doing its job by sending the water to a drain. Bypass the softener and find the cause; a running overflow wastes water and salt.
Does the brine tank overflow need an air gap?
Yes. Water-Right's manual tells you to allow an air gap for the overflow line as per the drain line instructions, which call for 1-1/2 inches or twice the pipe diameter, whichever is greater. The end of the overflow tube should sit above the receptor's rim, held so it cannot slip down.
