
How to Confirm Water Flow Direction at a Softener Loop
Water softener loop flow direction is found by tracing: the inlet leg connects back to the main shutoff and meter, and the outlet leg leads to the water heater and fixtures. Confirm it with a test, not a guess. Close one leg's valve and drain the jumper: the leg that keeps flowing is the inlet. Or crack the main when the jumper comes out: the leg that spurts is the inlet.
Loops are rarely labeled. A reversed connection runs, regenerates and uses salt, but it does not soften properly. That is why it gets blamed on the softener for months.
What a Loop Is and Why It Has No Labels
A softener loop is the main cold line brought out of a wall or ceiling as two stubs, usually in a garage, basement or utility closet, joined by a short U-shaped jumper. Until a softener is fitted, water runs out through one leg, round the jumper and back in through the other. The outdoor taps are normally teed off before the loop, so they stay on hard water. What to ask a builder to rough in is covered in roughing in a water softener loop in new construction.
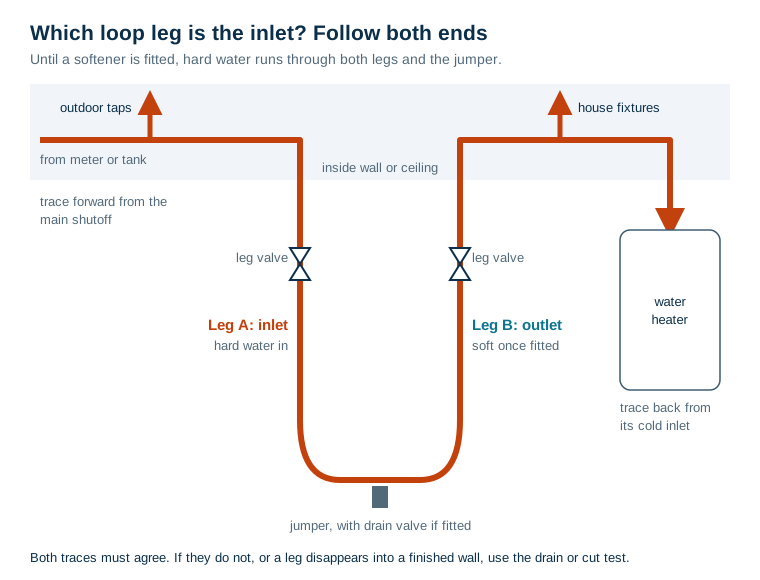
Builders rarely mark the legs because, with the jumper in place, direction does not matter. It only matters once a softener goes in. And there is no convention. The inlet can be the left leg in one house and the right leg in the identical house next door, where the plan is mirrored.
The softener side is always marked. The valve body or bypass carries flow arrows or IN and OUT. Clack's WS1 service manual says its bypass handles "point in the direction of flow indicated by the engraved arrows on the control valve" in normal operation. Morton's installation manual tells installers to "trace the water flow direction to be sure hard water is to inlet." Neither manual can tell you which of your two pipes is which.
Method 1: Trace Both Ends, With Temperature as a Guide
Needs: a flashlight, and ideally an infrared thermometer. Cuts nothing.
- Trace forward from the main shutoff. Start at the meter or well pressure tank and follow the cold main. Pass the tee for the outdoor taps and keep going until the pipe reaches one of the loop legs. That leg is the inlet.
- Trace backward from the water heater. Start at the heater's cold inlet, which is usually marked, and follow that pipe back. It should reach the other leg. That is the outlet.
- Use temperature where pipes run together. In a basement ceiling with cold, hot and gas lines side by side, open a cold tap in the house fully for a few minutes. The pipes carrying fresh water from outside cool down, and in humid weather they sweat. The hot line and the gas pipe do not. An infrared thermometer, or a hand run along each pipe, lets you stay on the right line.
The limit. Tracing only works where you can follow the pipe. Once both legs go into a finished wall, you have no evidence left, and temperature cannot tell you which leg is which. Both legs carry the same flowing water. Only accept this method when the forward and backward traces agree. If they do not, use Method 2 or 3.
Method 2: The Shutoff Isolation Test
Needs: a shutoff valve on each loop leg and a drain valve on the jumper, which many builders fit. Also a bucket. Cuts nothing.
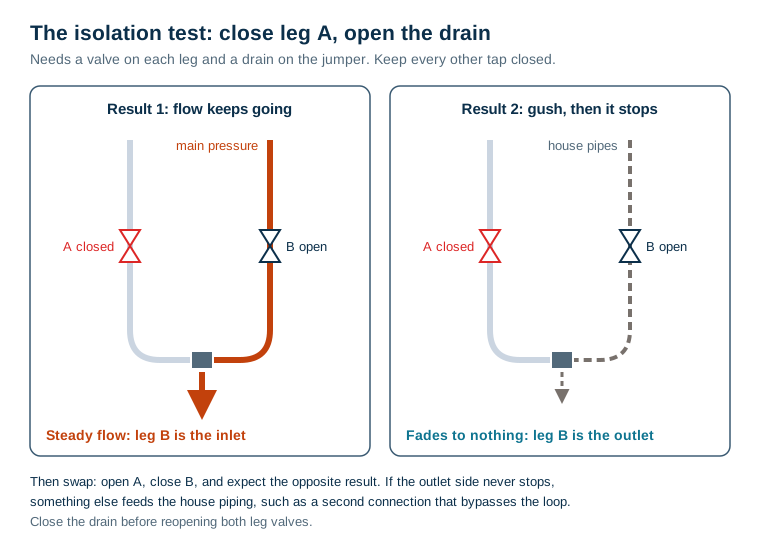
- Close every tap and fixture in the house.
- Close the valve on one leg. Call it leg A.
- Put the bucket under the jumper drain and open it.
- Watch the flow for 30 seconds:
- Steady, strong flow that does not slow down: the open leg (B) is connected to main pressure. Leg B is the inlet.
- A gush that fades to a trickle and stops: leg B is only draining back the water in the house pipes. Leg B is the outlet.
- Close the drain, open leg A, close leg B, and repeat. You should get the opposite result.
- Close the drain and reopen both leg valves.
If both legs keep flowing, something other than the loop is feeding the house pipes. That might be a second connection between the supply and the house, or a fixture teed off before the loop that also connects after it. That is worth knowing before you fit a softener, because water taking that route never passes through it. Clack's manual uses the same principle for its bypass shut-off position: if water is still available on the outlet side, it indicates "a plumbing connection somewhere in the building bypasses the system." What that looks like after installation is covered in why water is still hard after installing a softener.
Method 3: The Pressure-Side Check at the Jumper
Needs: a bucket, towels and a pipe cutter. Only cuts the jumper, which has to come out anyway to fit the softener. Do this before anything is connected.
- Close the main shutoff and open a low downstream faucet to relieve the pressure. Then close that faucet.
- Cut out the jumper with the bucket underneath. Some water will drain from both legs.
- Hold the bucket so it covers both open legs, and crack the main shutoff open for two seconds. Then close it.
- The leg that pushes water is the inlet. The outlet leg only dribbles.
- Mark the inlet with tape and an arrow pointing toward the softener, and mark the outlet with an arrow pointing away.
This is the definitive check. It uses the same logic as the old blow test, where air blown into the outlet escapes through an open faucet and the inlet holds against the closed main. Water and a bucket are harder to misread.
Slab Homes, Garages and Wells: Which Method to Use
Where the loop is decides which test you can actually run.
- Slab-on-grade houses. The loop often comes up through the garage slab or out of a garage wall. Both legs vanish into concrete within inches, so tracing is impossible. Unless the builder fitted leg valves and a jumper drain, go straight to Method 3 when the jumper comes out.
- Basements with an open ceiling. Tracing usually works. Confirm it with Method 2 if the valves are there, because two traces through a crowded joist bay are easy to confuse.
- Wells. "The main" means the line after the pressure tank. Trace forward from the tank tee, not from the well head. Run Method 3 with the pump breaker on, so the pressure tank supplies the test flow. The pump may start during the test; that is normal.
- Utility closets with a loop behind drywall. Look for an access panel first. Builders often leave one behind the water heater or in the closet next to it. If there is none, Method 3 is the safe choice.
Whichever method you use, label the legs permanently once you know. Write IN and OUT with an arrow on the pipe in paint marker, or use a pipe label, and note it in the house paperwork. The next owner, or a technician, will not have to work it out again.
The Symptom Pattern of a Reversed Installation
If a softener is already in place and you suspect it is connected backwards, this is what it looks like.
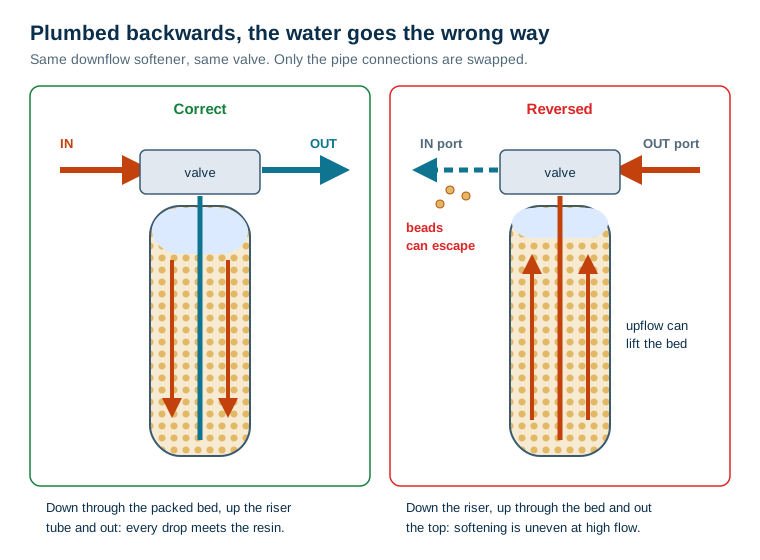
In a normal downflow softener, water enters the valve inlet, passes down through the packed resin bed, collects at the bottom distributor and rises up the riser tube to the outlet. Connected backwards, supply water enters the outlet port, goes down the riser, comes out at the bottom and pushes up through the bed before leaving from the top.
The control valve cannot tell. So a reversed install produces a pattern that reads like a defective unit:
| What you notice | Why the reversal causes it |
|---|---|
| The softener runs, regenerates on schedule and uses salt | Regeneration is driven by the valve's timer or meter, not by which way service water flows |
| Water tests soft at a trickle but hard during showers and laundry | Upward flow can lift and loosen the bed at higher flow rates, so water finds channels past the resin |
| A metered unit regenerates rarely or reports odd usage | Many valves put the flow meter in the outlet port, so reversed flow may be counted wrongly |
| Amber beads in aerators, toilet tanks or appliance screens | On some valves, the top of the tank has a coarser screen than the bottom distributor, so resin can escape. See resin beads in household plumbing |
| New resin, a new valve or a replaced unit changes nothing | The fault is in the plumbing, not the softener |
The last row is why reversals go undiagnosed. A technician checks the programming, salt level, injector and resin. Those are all fine, so a part gets replaced and nothing improves. How much softening a reversed unit manages varies with the valve, the bed depth and the household's flow rates. Do not count on it softening at all.
To check an existing install: put the bypass in bypass, then trace or test the loop legs as above. Compare the result with the arrows on the valve. If the house supply is connected to the port marked OUT, the install is reversed.
Fixing a Reversed Loop Connection
The fix is to swap the connections. Do not turn the softener round, because the valve's internal flow paths only work one way. With the bypass in bypass and the main shut off:
- Disconnect both loop legs from the bypass or valve adapters.
- Reconnect so the inlet leg goes to the port marked IN and the outlet leg to OUT. Flexible connectors make this easier if the legs do not line up.
- Pressurize slowly through the bypass. Check for leaks.
- Because reversed flow may have carried resin fines or beads downstream, clean aerators and fixture screens.
- Run a manual regeneration so the bed resettles, and test the water the next day at a cold tap.
If beads kept appearing after the fix, or the softener was reversed for a long time, have the resin level and the top screen checked. The upflow may have pushed resin out of the tank. Other install errors that look like softener faults are collected in common water softener installation mistakes.
What Getting the Direction Right Will Not Fix
- An undersized softener, or one set to the wrong hardness, still lets hardness through when connected the right way round.
- Fixtures teed off before the loop stay hard by design. That includes outdoor taps and, in some houses, a kitchen cold line.
- Iron, sediment or chlorine that damages resin needs its own treatment ahead of the softener, whichever way the loop runs.
Confirm the flow direction on the loop before the softener goes in. Then check it against the arrows on the valve before you open the bypass.
Frequently Asked Questions
How do I know which pipe is the inlet on a water softener loop?
The inlet is the leg that connects back to the main shutoff and the meter or pressure tank. The outlet is the leg that leads on to the water heater and house fixtures. Trace both legs from each end. If you cannot see the pipes, close one leg valve and open a drain on the jumper: the leg that keeps flowing is on main pressure and is the inlet. When the jumper comes out, the leg that spurts when the main is cracked open is the inlet.
What happens if a water softener is installed backwards?
Water enters the valve's outlet port, runs down the riser tube, rises up through the resin bed and leaves through the top. The unit still runs and regenerates, so it looks normal. But softening is uneven, especially at high flow, a meter in the outlet port may count flow wrongly, and on some valves resin beads can be carried into the house. It behaves like a defective softener, which is why it often goes unnoticed for months.
Is the water softener loop inlet always on the left?
No. There is no standard side. Builders run loops from whichever direction the main comes from, and the same model house can be mirrored on the next lot. Never assume left is in. Confirm it.
Can I just blow into the pipes to find the inlet?
Only once the jumper is cut, with the main shut off and a downstream faucet open. Air blown into the outlet leg escapes through the open faucet. The inlet leg holds, because the closed main valve blocks it. The pressure-side check described here does the same job with water and a bucket, and it is harder to misread.
Which way do the arrows on a softener valve point?
Toward the house. The arrows on the valve body or bypass show the direction of flow, from the inlet port to the outlet port. Clack's manual says the bypass handles point in the direction of the engraved arrows in normal operation. Morton's manual says to trace the water flow direction so hard water goes to the inlet.
