
Common Water Softener Installation Mistakes
The costliest water softener installation mistakes are:
- flow plumbed backwards through the valve
- a drain line pushed into the standpipe with no air gap
- a drain line that is too small, too long or too high
- a missing or half-open bypass
- a bonding jumper left off metal pipe
Most of them can be seen on inspection. Many only show up weeks later as a symptom that seems to have nothing to do with the install.
This page is built to be read in both directions. Before an install, it is a checklist. After one, you can start from a symptom and work back to the mistake behind it.
Water Softener Installation Mistakes, Matched to Their Symptoms
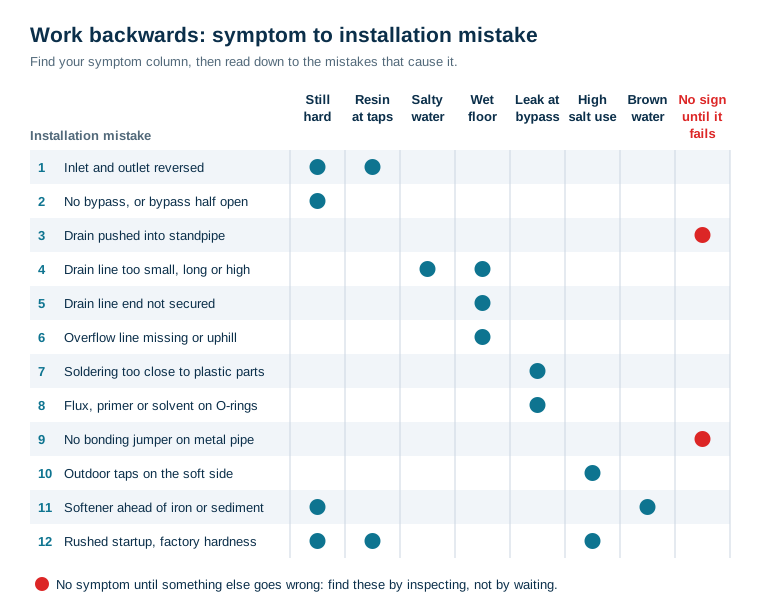
Two of the twelve have no symptom at all until something else fails. A missing air gap does nothing until the sewer backs up. A missing bonding jumper does nothing until there is an electrical fault. Those two are marked in red. The only way to find them is to look.
Flow and Bypass Mistakes
1. Inlet and outlet reversed
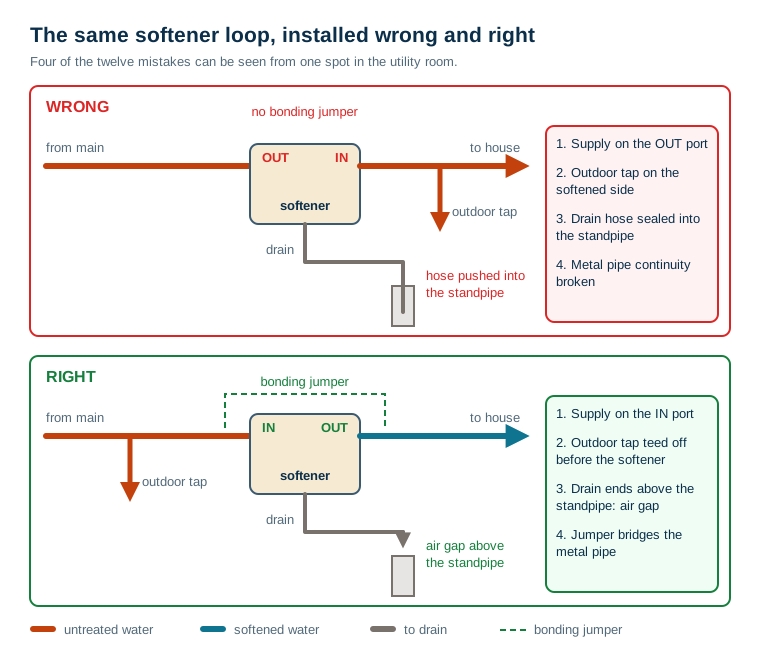
Wrong: the supply from the main is connected to the valve's outlet port. Right: it goes to the port marked IN, usually with an arrow cast into the bypass or valve body.
Symptom later: hard water, low pressure, or resin beads at faucets and in aerators. Running backwards pushes water up the riser and down through the bed the wrong way. The internal screens are not designed to hold the resin back in that direction. A.O. Smith's owner's manual lists "appliance is plumbed backwards" as a cause of no soft water.
Check: find the direction arrow on the bypass or valve and trace the pipe back to the main. The full method, including loops where the pipes run behind a wall, is in how to confirm water flow direction at a softener loop.
2. No bypass, or a bypass left half open
Wrong: the softener is hard-piped with no bypass valve. Or a three-valve bypass is left with the middle valve partly open. Right: there is a bypass valve, or a three-valve loop, and it sits fully in service.
Symptom later: with no bypass, there is no way to keep water flowing to the house during service. The first repair means shutting off the whole house. Not every online softener ships with one, so check the box list before you buy; comparing what ships with an Aquasure and a SpringWell shows how far apart two similar units can be. With a bypass cracked open, untreated water blends with softened water. The water tests partly hard even though the softener is working perfectly.
Check: move the lever or valves fully to service until they stop. On a three-valve loop, inlet and outlet should be open and the middle valve closed. A partial bypass is one of the first things to rule out in why water is still hard after installing a softener.
Drain Line Mistakes
3. Drain line pushed into the standpipe, with no air gap
Wrong: the drain tubing is pushed down into the standpipe, taped into a floor drain, or clamped into a trap. Right: it ends above the drain receptor with open air between the end of the tube and the wastewater.
Water-Right's installation manual is blunt about it: "Never insert a drain line into a drain, sewer line, or trap." It calls for an air gap of 1-1/2 inches or twice the pipe diameter, whichever is greater, "to prevent the possibility of sewage being back-siphoned into the softener."
Symptom later: none, until the drain backs up or the supply loses pressure. Then contaminated water can be drawn back toward the softener, and so toward the drinking water. It is also a common reason an install fails inspection.
Check: look at the end of the drain line. You should be able to see daylight between it and the drain opening. If the tube reaches down inside the standpipe, pull it up and secure it. Your local plumbing code decides what counts as an approved air gap or air-gap fitting.
4. Drain line too small, too long or too high
Wrong: narrow tubing run a long way to a distant drain, lifted overhead or kinked around a corner. Right: the diameter and routing the manual allows for your model's backwash rate.
Water-Right specifies a 1/2-inch inside-diameter line, and a 3/4-inch line if the backwash rate is over 7 gallons per minute. It also tells installers to "be sure that the drain can handle the backwash rate of the system." Other manuals set their own limits for length and lift height.
Symptom later: salty water after regeneration, because the rinse is choked and does not clear the brine. Or water in the brine tank creeping toward the overflow, because a restricted drain upsets the cycles. Full requirements are in water softener drain line requirements.
Check: trace the whole run. Measure the lift above the valve and look for kinks, sags and reductions to a smaller fitting.
5. Drain line end not secured
Wrong: the tube lies loose over the rim of a laundry tub or standpipe. Right: it is clamped or tied at the air gap so it cannot move.
Symptom later: a wet floor after a regeneration nobody saw. Backwash leaves the valve at several gallons a minute, and a loose tube whips out of the drain at 2 a.m.
Check: pull gently on the end of the tube. It should not move.
6. Brine tank overflow line missing, run uphill or teed into the drain line
Wrong: the overflow elbow on the brine tank is capped, left open to the floor, run uphill, or teed into the valve's pressurized drain line. Right: it has its own tube running downhill to the drain. Water-Right describes the overflow line as a gravity drain that "cannot run higher than the initial drain point."
Symptom later: a flooded floor the one time the brine valve or float fails. That is exactly the moment the overflow exists for.
Joint and Fitting Mistakes
7. Soldering too close to plastic parts
Wrong: sweating copper joints next to the connected bypass, or with the drain flow control fitting already in place. Right: solder the adapters first, let them cool, and only then fit the nuts, split rings and O-rings.
Water-Right warns that heat from soldering can damage these parts. It says solder joints near the drain must be done before the drain line flow control is connected, with at least 6 inches between them.
Symptom later: weeping at the bypass connections or a drain flow control that no longer regulates. Both can take weeks to show.
8. Flux, primer or solvent cement on O-rings
Wrong: flux brushed across the adapter and onto its O-ring, or PVC primer and cement dripping onto the bypass. Right: keep them off. Water-Right tells installers to avoid getting flux, primer and solvent cement on the O-rings, split rings, bypass valve or control valve.
Symptom later: O-rings that swell, soften or crack, then leak at the bypass. It often looks like a failed bypass when it is really a damaged seal.
Budget online units make this mistake more likely, because the adapters you solder are often ones you bought separately. The Aquasure Harmony box-contents audit lists which fittings ship with one of the cheapest two-tank softeners and which you still have to buy before the water goes off.
Electrical Mistake
9. No bonding jumper on metal pipe
Wrong: a softener with a plastic bypass and valve is cut into copper or galvanized pipe, and nothing bridges the gap. Right: a copper jumper, clamped to the metal pipe on both sides, restores continuity.
In many homes the metal water pipe is part of the electrical grounding or bonding path. A.O. Smith warns that before installing on metallic plumbing you must "securely install two grounding clamps and a #4 copper wire," and that failing to do so "can result in death or electric shock." Water-Right's manual says the same in its own words: if the building's electrical system is grounded to the plumbing, install a copper grounding strap from the inlet pipe to the outlet pipe.
Symptom later: usually none, until an electrical fault has no path back through the pipe. Occasionally a tingle at a fixture, which needs an electrician the same day. Whether and how a jumper is required where you live is an electrical code question. If you are unsure, it is an electrician's call.
Layout Mistakes
10. Outdoor taps on the softened side
Wrong: outdoor hose bibs and irrigation are left on the house side of the softener. Right: they are teed off the supply before the softener, as the Water-Right manual suggests planning at the start of the plumbing.
Symptom later: salt use that seems too high for the household, and a softener that regenerates more often in summer. Watering a lawn through a softener spends capacity, salt and regeneration water on grass.
11. Softener ahead of iron, sediment or other pretreatment
Wrong: on a well, the softener is the first thing after the pressure tank, ahead of the sediment or iron filter. Right: stages that protect the resin go before it.
Symptom later: brown or orange water, fouled resin, and hardness that breaks through early because the bed is coated. The softener was sized for clean water and never got it.
12. A rushed startup and a factory hardness setting
Wrong: the bypass is thrown straight to service with full pressure, and the valve is left at its factory hardness, often 20 grains. Right: fill slowly, purge the air, flush, leak test and program the real hardness. The sequence is in the water softener startup procedure.
Symptom later: resin in the drain or at faucets from a fast fill. Hard water between regenerations if your water is harder than the default. High salt use if it is softer.
Two More Placement Checks
These are not in the twelve because they depend on the manual, but they are worth confirming.
- Distance to the water heater. Water-Right does not recommend less than 10 feet of piping between the softener outlet and the water heater inlet, because hot water can travel back into the unit. Other manufacturers set their own minimum.
- Freezing. The same manual says the unit and its drain and overflow lines should never be exposed to temperatures under 33°F. A drain line through an unheated garage wall counts.
What an Inspection Can and Cannot Tell You
A visual check finds every mistake on this list except the hardness setting, and a hardness test finds that. It cannot tell you whether the softener was the right size for the house, or whether the water needed a softener at all rather than a different treatment. A softener removes hardness and some dissolved iron. It does not remove bacteria, sediment, most chemical contaminants or oxidized iron. A perfectly installed unit on the wrong water problem is still the wrong unit.
If you have a symptom, find its column in the matrix above and check each mistake in that column, starting with the ones you can see. If you are about to install, work down the list before the water goes on. If someone else is doing the work, the same list doubles as your questions when choosing between a plumber, a dealer and a big-box installer. Most water softener installation mistakes take minutes to fix before startup and a service call to fix after.
Frequently Asked Questions
What is the most common water softener installation mistake?
Plumbing the inlet and outlet backwards is one of the most common, and one of the easiest to check. Water enters the valve through the outlet port and runs the wrong way through the tank. The result can be hard water, low pressure or resin beads in the fixtures. A.O. Smith's troubleshooting table lists an appliance plumbed backwards as a cause of no soft water.
Does a water softener drain need an air gap?
Yes. The drain line should end above the standpipe, floor drain or laundry tub with open air between the end of the line and the wastewater. Water-Right's manual calls for a gap of 1-1/2 inches or twice the pipe diameter, whichever is greater, so sewage cannot be back-siphoned into the softener. Local plumbing code sets the legal requirement where you live.
Can a water softener be installed too close to a water heater?
Some manufacturers set a minimum. Water-Right does not recommend installing a treatment unit with less than 10 feet of piping between its outlet and the water heater inlet, because hot water can migrate back toward the softener. Check your own manual for its figure.
Why is my water still hard after a new softener was installed?
Look at installation causes first: a bypass valve left in bypass or half open, inlet and outlet reversed, a hardness setting never changed from the factory default, or outdoor and kitchen lines that were never routed through the softener. After that, check whether the unit is drawing brine and regenerating.
Should outside faucets be on softened water?
Usually not. Irrigation and hose water do not need softening, and every gallon through the softener uses capacity and salt. Tee the outdoor lines off the supply before the softener. Some owners do soften one outdoor tap for washing cars, which is a deliberate choice rather than a mistake.
Do I need a jumper wire when installing a water softener?
If the softener is installed in metal water pipe and the home's electrical system uses that pipe for grounding or bonding, yes. A.O. Smith and Pentair both call for grounding clamps and a copper jumper across the softener on metal plumbing. Where there is any doubt about the grounding system, have an electrician check it.
