
Water Softener Planning During a Remodel
Adding a water softener during remodel work costs far less than adding one later, because the expensive parts are the plumbing the walls hide: the loop, a drain line with an air gap and an electrical outlet. Decide on them before demolition and install them at rough-in. If you already have a softener, bypass it before the first water shutoff. Keep it out of service until the new pipes have been flushed, so debris and air never reach the resin.
That is the whole plan in two sentences. The rest of this page puts it on a timeline, phase by phase, and then gives the shutdown and return procedure for an existing softener in detail.
The Remodel Timeline, Phase by Phase
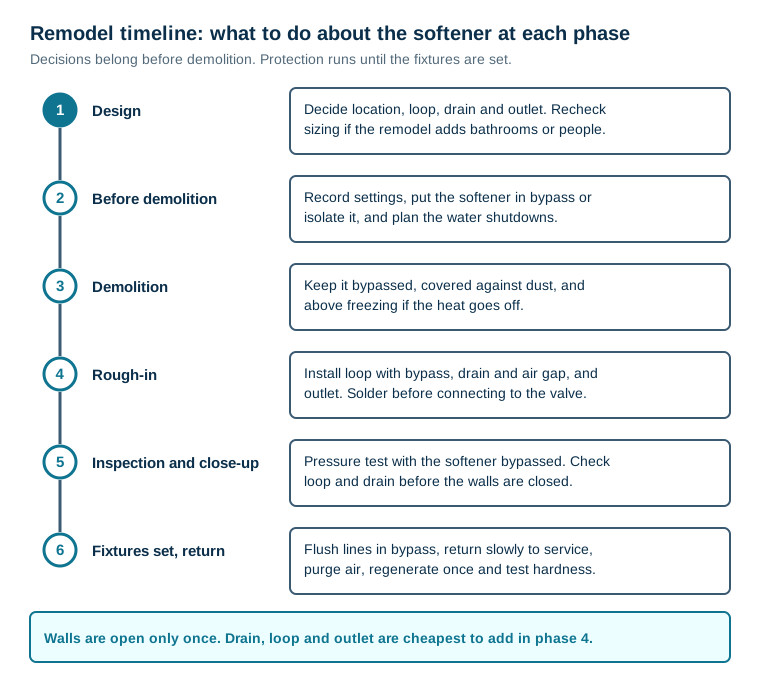
| Phase | Decide | Install or do | Protect |
|---|---|---|---|
| 1. Design | Location, loop, drain route, outlet, which lines stay hard | Nothing yet | Note current settings |
| 2. Before demolition | Shutdown plan with the plumber | Photograph valve settings; put softener in bypass | Cover the unit |
| 3. Demolition | None | None near the softener | Dust, impact, freezing |
| 4. Rough-in | Final pipe sizes | Loop with bypass, drain with air gap, outlet, any bonding jumper | Sweat joints before connecting to the valve |
| 5. Inspection and close-up | None | Pressure test with softener bypassed | Check loop and drain before walls close |
| 6. Fixtures set | None | Flush, return slowly, regenerate, test | Remove the cover last |
The two phases that decide the cost are 1 and 4. Everything a softener needs from the building goes in at rough-in. Miss that window and the same work later means opening a finished wall or ceiling.
Phase 1: Adding a Water Softener During Remodel Design
Settle these on paper before anyone swings a hammer.
Where the softener goes. It needs to be on the main line after the pressure tank or meter and before the water heater, near a drain and an outlet, on a level floor, and somewhere that stays above freezing. A remodel is the chance to move it out of a cramped closet or away from a finished room where a leak would do damage.
What stays unsoftened. Most manufacturers recommend leaving outdoor taps on hard water. The Hellenbrand ProMate 6.0 manual says "Outside faucets should be left on hard water." A remodel is also the easiest time to run a separate hard line to a kitchen tap if you want one. Both are cheap while the walls are open and awkward afterwards.
Whether the size still fits. A new bathroom mainly raises peak flow. New occupants raise the daily grain load. They are separate checks, and many remodels need only a reprogram rather than a bigger unit. The two checks are worked through in how to resize a softener after adding a bathroom.
Whether the pipe material is changing. If copper is being replaced with PEX or CPVC, the metal path that grounded or bonded the plumbing may be broken. Hellenbrand's manual calls for a jumper ground wire between the inlet and outlet pipes "whenever the metallic continuity of a water distribution piping system is interrupted." Ask your electrician how that applies to your house.
Phase 4: What to Rough In While the Walls Are Open
A whole house softener needs four things from the building. All four are cheapest at rough-in.
- A softener loop with a bypass. The main line comes to the softener location as an inlet and an outlet, with a bypass so the house has water when the softener is serviced. Where the plumbing is being run fresh, as in a basement finish or a gut renovation, the loop can be built in the way it would be in a new house. That approach is covered in water softener planning for new construction.
- A drain. Regeneration discharges to a drain through an air gap: a standpipe, laundry box or floor drain. Plan the run so it does not need to climb far overhead. Hellenbrand notes that overhead drains should be avoided where possible to prevent back pressure on the brine injector.
- An outlet. Most control valves need continuous power from a standard receptacle. Hellenbrand recommends surge protection for its electric controls.
- Access space. Leave room to lift the valve off the tank and to pour salt. Do not box the softener in behind a finished wall.
Soldering near the valve. The heat from a torch can damage plastic valve parts. The Fleck 5600SXT manual says soldering of joints near the drain port must be done before the drain line flow control fitting is connected, with at least 6 inches between that fitting and the solder joints. Hellenbrand's manual says solder joints should be cool before the connections are made. Make the sweat joints first and let them cool, then connect the valve.
Pressure testing. Test the new plumbing with the softener in bypass. The Fleck manual caps water pressure at 125 psi. A test can exceed normal line pressure, and there is no reason to put the resin tank through it.
Protecting an Existing Softener During Construction
Plumbing work puts three things into the pipes that a softener should never see: debris (solder, flux, pipe shavings, thread sealant, sand), air from every drain-down and refill, and pressure surges when the water is turned back on quickly.
Each of these causes trouble in a specific place:
- Debris in the valve. The Fleck manual's troubleshooting table lists "foreign material in control" as a cause of a drain that flows continuously. It lists foreign material in the brine valve or the brine line flow control as causes of excess water in the brine tank. Grit that reaches the injector stops the softener drawing brine.
- Debris on the resin. Fine sediment packs the top of the bed and adds pressure drop.
- Air and surges. A slug of air hitting a full resin tank, or a valve opened fast against a drained tank, can disturb the bed and push air out through the taps. That spitting is covered in why air appears in faucets after softener service.
The shutdown procedure, before the first water shutoff:
- Record the settings. Photograph the display for hardness, capacity or salt dose, regeneration time and valve type. Most valves keep them through a power loss, but a remodel can involve weeks of unplugged time.
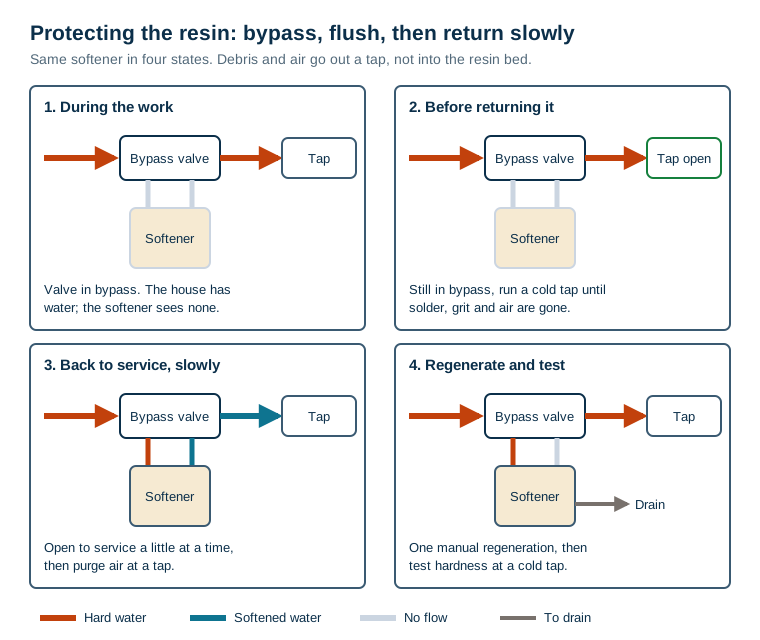
- Put the softener in bypass. On a single-lever bypass, move it to bypass. On a three-valve loop, close the inlet and outlet valves and open the bypass valve. The house then has water from the bypass, and the softener sees none.
- Unplug the valve. A bypassed softener has no water supply. Any regeneration it starts, whether from a timer or from a metered valve's calendar override, runs without water.
- Cover it loosely. Drywall dust in the salt and the brine tank is avoidable. A plastic sheet over both tanks is enough. Leave space so nothing sweats and moulds.
- Keep it above freezing. The Fleck manual says the unit "cannot be subjected to freezing conditions." If a winter remodel leaves the house unheated, keep the utility space heated, or drain and winterize the softener.
- Tell every trade. Put a note on the bypass: "Softener in bypass. Do not return to service." A plumber who flips it back to test pressure puts everything above straight into the resin.
Returning the Softener to Service
Do this after the fixtures are set, not when the plumbing first holds water. The Fleck installation steps give the order, and they apply equally after a remodel.
- Flush in bypass first. With the softener still in bypass and the main water on, open a cold tap nearby. Let it run until the water is clear and free of solder and grit. Fleck's manual says to let it run a few minutes or "until the plumbing is free from foreign material (usually solder)." Then open each new fixture briefly, with the aerators removed if you can. Put the aerators back after.
- Return slowly. Move the bypass to service a little at a time. Fleck's wording is to "slowly place the bypass in service position and let water flow into the mineral tank." On a three-valve loop, open the inlet partway, then the outlet, then close the bypass.
- Purge air. When the flow into the tank stops, slowly open a cold tap and let it run until the air is gone.
- Plug in and check the settings against your photograph. Reset the clock.
- Run one manual regeneration. It refreshes a bed that may have sat idle for weeks and tells you whether the valve cycles, draws brine and drains normally. On a Fleck 5600SXT, an immediate regeneration starts by holding the Extra Cycle button for five seconds.
- Test hardness at a cold tap after the regeneration finishes. A result near zero means the softener has survived the work. If it has not, see the section below.
If the Remodel Changes the Water
Two remodel projects change what the softener has to treat.
A new water heater or tankless unit. The softener has to be upstream of it. If the heater moves, check that the new position is still downstream of the softener and that hot water cannot back up into the valve. Hellenbrand's caution is that inlet water must not exceed 110°F.
A new well, or a switch from well to city water. A different source almost always means different hardness, and possibly iron. Test the new supply before reprogramming. The same point applies after any source change.
What a Remodel Plan Cannot Fix
- It cannot make an undersized softener big enough. Good plumbing does not add grain capacity or flow. If the remodel pushes the house past the unit's rating, it needs replacing, not protecting.
- It cannot rescue resin that was already failing. If the softener was losing capacity before the work started, the remodel is a good time to replace the resin or the unit, but the plan does not restore it.
- It does not treat anything except hardness and a little dissolved iron. New pipes do not change lead, bacteria or nitrate in the supply.
- It cannot overrule local code. Drain, air gap, backflow and bonding requirements depend on the plumbing code your city adopted. Your plumber and the permit office have the final word.
Put the softener on the design drawings, rough in the loop, drain and outlet while the walls are open, and keep the existing unit in bypass until the new lines run clear.
Frequently Asked Questions
When should I add a water softener during a remodel?
Decide at the design stage and install the plumbing at rough-in, while walls and floors are open. That is when the softener loop, the drain line with its air gap and an electrical outlet are cheapest to add. The softener itself can be connected after the dusty work is over.
Should I bypass my water softener during construction?
Yes. Put it in bypass, or isolate it, before the water is shut off for the first time, and keep it bypassed until the new plumbing has been flushed. That keeps solder, pipe shavings, sealant and air out of the resin bed and the control valve.
Can construction debris damage a water softener?
It can. Fleck's 5600SXT manual lists foreign material in the control as a cause of a drain that flows continuously, and in the brine valve as a cause of too much water in the brine tank. Its installation steps flush the plumbing through a tap, with the softener in bypass, until it is free of foreign material, usually solder.
Do I need to resize my softener after a remodel?
Only if the remodel changes what the softener sees. A new bathroom mainly raises peak flow, while more people raise daily grain load. Check both numbers before buying a new unit, since many remodels need only a reprogram.
Can I leave a water softener in an unheated house during a remodel?
Not if it could freeze. Fleck's manual says the unit cannot be subjected to freezing, and a frozen valve or tank can crack. If the heat will be off in cold weather, keep the space heated, or bypass the softener, drain it and follow the manufacturer's winterizing steps.
How do I restart a water softener after plumbing work?
With the valve still in bypass, run a cold tap until the water is clear. Then move the bypass slowly to service, let the tank fill, purge air at a cold tap, run one manual regeneration and test hardness at a cold tap afterwards.
