
Water Softener Startup Procedure After Installation
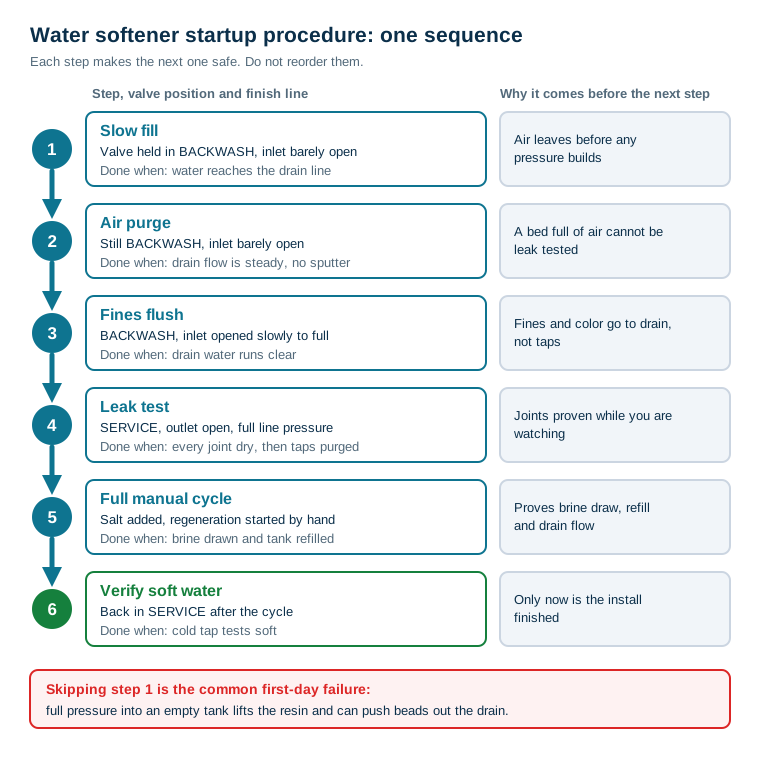
The water softener startup procedure after installation is one sequence, done in this order:
- Fill the tank slowly with the valve held in backwash.
- Purge the air until the drain runs steady.
- Flush the resin fines until the drain runs clear.
- Leak test every joint at full line pressure.
- Run one full manual regeneration with salt in the tank.
- Test the water.
Each step makes the next one safe. The most common first-day failure is opening full pressure into a dry tank, which is why the list starts with a slow fill.
This page assumes the plumbing, drain line and power are already done, as covered in how to install a whole-house water softener. Commissioning is where you find out whether that installation actually worked.
The Water Softener Startup Procedure as One Sequence
Manufacturer manuals cover the same ground, but they split it across installation, programming and maintenance sections. The logic is easier to follow when it is read as one chain:
- Slow fill comes first because an empty tank is full of air, and air under sudden pressure does damage.
- Air purge comes before pressurizing the house because trapped air spits at faucets, hammers pipes and makes a leak test meaningless.
- Fines flush comes before service because loose resin fines, shipping dust and any color from new media should go to the drain, not to your taps.
- Leak test comes before regeneration because the first automatic regeneration will run unattended in the middle of the night. You want every joint proven while you are standing there.
- A full manual cycle comes before trusting the unit because it is the only way to see brine draw, refill and drain flow working together.
- The water test comes last because it is the only proof the job is done.
Before you open any water, set up these four things.
- The bypass is in bypass. The softener is isolated and the house still has water.
- The control valve has power and the time of day set. You need to drive it between positions by hand. Enter the hardness now too, or right after startup, using how to set hardness on a water softener.
- The drain line is secured at its air gap so it cannot whip loose when water arrives at speed.
- The brine tank has only the small starting amount of water the manual asks for. Water-Right's installation manual, for example, has the installer add about 3 inches by hand. It warns that too much water at startup can cause a salty water complaint after the first regeneration.
Step 1: Slow Fill With the Valve Held in Backwash
Drive the control valve into its backwash position. On most electronic valves you start a manual regeneration and step forward until the display reads backwash. Then stop it there. Water-Right's procedure unplugs the transformer once the valve reaches backwash so the valve cannot move on by itself.
Backwash is the right position for filling. Water goes down the center riser, out through the bottom distributor and up through the resin. Air is pushed up ahead of the water and out through the drain line. In service, the flow runs the other way and the air would be pushed toward the house.
Now open the inlet handle of the bypass only very slightly. Leave the outlet closed. The Water-Right manual says to open the inlet "very slightly allowing water to fill the tank slowly in order to expel air" and adds a caution: "If water flows too rapidly, there will be a loss of media to the drain." A.O. Smith's owner's manual gives the same instruction in its own words, to "slowly fill media tank."
You will hear air hissing or gurgling out at the drain. That is the fill working.
Why fast pressurization damages a new bed
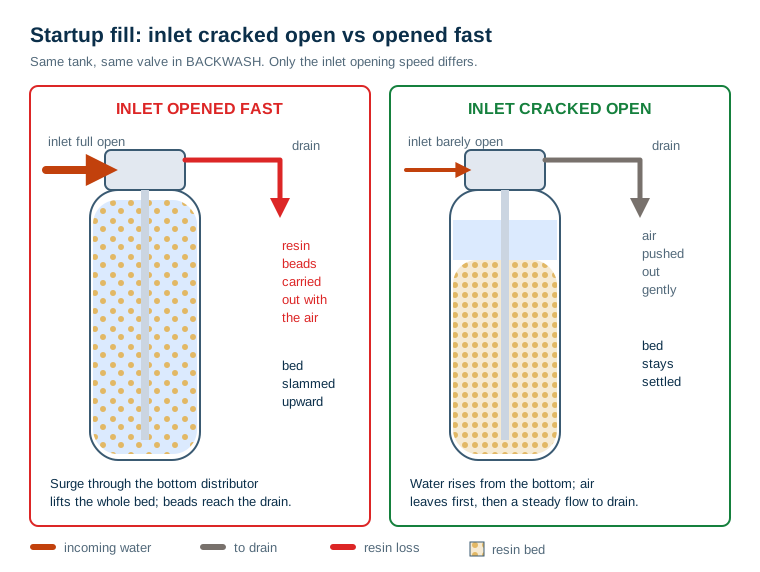
A dry or half-dry tank holds a large volume of air above and within the resin. If the inlet is thrown fully open, household pressure drives water through the bottom distributor at full rate. The surge lifts the bed, the air rushes for the only exit, and it takes resin beads with it through the drain. Beads in the drain line or air gap after startup mean the fill was too fast.
The same surge also slams the internal distributor and riser. It can dislodge a riser that is not seated, and it sends a pressure spike to every new joint at the moment they are least tested. None of this shows up as a leak on day one. It shows up weeks later as resin in the plumbing or hard water that returns before regeneration, because the bed is shallower than it should be.
Step 2: Purge the Air Until the Drain Runs Steady
Leave the inlet barely open and watch the end of the drain line at the air gap. At first you get spitting, then a mix of air and water, then a steady, solid stream. The steady stream is your finish line, not a number of minutes. A larger tank or a tank that had no water in it at all takes longer.
Do not move on while the drain is still sputtering. Air left in the tank now gets carried into the house once the valve goes to service. You then chase it out of every faucet, which air in faucets after softener service covers if it has already happened.
Step 3: Flush the Resin Fines Until the Drain Runs Clear
With air gone, open the inlet the rest of the way, slowly, over several seconds. You are still in backwash. The bed now lifts and expands as it is designed to, and the backwash flow control in the drain port limits the rate.
New resin carries fine broken particles and dust from shipping and handling. Some media also give the first water a tint. Backwash exists to lift those out of the bed and send them to the drain. Keep it running until the drain water is clear in a clear cup. Pentair's whole-house softener manual uses the same test at this stage: run backwash "until there is a steady flow of water at the drain."
Once it is clear, restore power if you unplugged the valve. Step it to the brine (brine draw and slow rinse) position. Here you check the one function that cannot be seen from outside:
- There should be a slow flow to the drain.
- The brine line should be pulling water from the brine tank, or pulling hard enough that you feel suction at the fitting if you disconnect it. Water-Right's procedure checks for this vacuum at the brine tank end.
Reconnect the brine line firmly. Then step to rinse, which should give a fast flow to the drain, and let it run until clear and free of air. This is the point where most manuals have you load salt into the brine tank.
Step 4: Leak Test Under Full Line Pressure
Return the valve to service. Now open the bypass outlet slowly. The house side is now connected to the softener and everything is at full line pressure for the first time.
Walk the whole loop with a dry paper towel:
- the inlet and outlet connections at the bypass
- every soldered, crimped, threaded or push-fit joint in the loop
- the valve-to-tank threads and the brine line fitting
- the drain line at the valve and at the air gap
- the brine tank overflow elbow
A drop that is not there at a glance often shows up on the towel. Stay with it for several minutes. Push-fit and compression joints that are not fully seated can hold for a while before they weep.
Then purge the house lines. A.O. Smith's order is to open a cold faucet to purge air, turn it off, and recheck for leaks. Water-Right's is to fully open a cold tap with no aerator, such as a laundry sink or tub spout, for two to three minutes or until the water runs clear, then do the same with a hot tap. Using a spout without an aerator stops loose debris lodging in a screen.
Why leak test here and not earlier? Before the air was out and the bed settled, pressure in the loop was not steady, so a dry joint then proved little. After this point the valve starts running on its own schedule. A leak found now costs a towel. A leak found at the next overnight regeneration costs a floor.
Step 5: Run a Full Manual Regeneration
With salt in the brine tank and every joint dry, start a complete manual regeneration from service and let it run through all its cycles. Watch it through at least brine draw and refill. This is what it proves:
- The drain line carries full backwash flow without backing up at the air gap.
- Brine is actually drawn. The level in the brine tank drops during brine draw.
- Refill happens and stops. The brine tank refills to the valve's programmed amount. It does not keep filling toward the overflow.
- Every cycle advances. The valve moves from each position to the next and ends back in service.
The first cycle also sorts out the brine tank. Water-Right notes that during the first regeneration the unit draws out the starting water and refills with the correct preset amount. After that, the brine level is the valve's, not the installer's guess.
Many manuals sanitize at this point too. Water-Right has you pour 1 ounce of household bleach into the brine well, not onto the float. The next regeneration flushes it through the bed. Your manual may call for a different sanitizer or none, so follow it.
The manual cycle is also the easiest time to learn your valve's buttons, while you are standing in front of it with the manual open.
Step 6: Verify the Water Is Actually Soft
Once the unit is back in service, test the water from a cold tap. Compare it with a sample taken from a tap that bypasses the softener, such as an outside faucet. The difference between the two numbers is the result of the install. Where to take each sample and how to read the pair is in how to check if a water softener is working.
Hot taps can run hard for a while. The water heater still holds hard water from before the install and needs time to turn over. Test cold first.
What Commissioning Cannot Fix
A correct startup proves the installation works. It does not correct the design choices made before it.
- It cannot fix sizing. A softener that is too small for the house's hardness and water use still runs out between regenerations.
- It cannot fix a wrong hardness setting. The valve regenerates on the number you gave it. Too low and hardness breaks through. Too high and it wastes salt.
- It cannot make up for missing pretreatment. A softener on a well with oxidized iron, sediment or chlorine still needs the filters that protect the resin ahead of it.
- It cannot treat what a softener does not remove. Bacteria, nitrate, arsenic and most other contaminants pass through ion exchange unchanged. A softener is not a disinfection or health-treatment device.
If a Step Fails
- Beads at the air gap or in the drain line: the fill was too fast, or the upper distributor or riser is damaged. Stop and check before running more water through it.
- Drain never stops sputtering: air is still getting in. Check the brine line fitting and the inlet connections, and confirm the valve is really in backwash.
- No suction in brine draw: the injector or its screen is blocked, or a brine line fitting is sucking air. Clean the injector and screen and reseat the fittings.
- Brine tank keeps filling during the manual cycle: the refill control or float is not shutting off. Deal with it before the first night.
- No water to the house after returning to service: check the bypass position first. It is the most common cause right after an install.
Fill slowly, purge, flush, prove the joints, prove the cycle, then test. Done in that order, the water softener startup procedure turns an installed unit into one you can trust.
Frequently Asked Questions
How do I start up a new water softener?
With the bypass still in bypass, put the control valve into backwash and hold it there. Crack the inlet open slightly so the tank fills slowly and air leaves through the drain. Once drain flow is steady and clear, step through brine and rinse, return to service, leak test every joint under full pressure, purge the house lines, add salt and run one full manual regeneration. Test the water the next day.
Why do you open the bypass valve slowly on a new softener?
The mineral tank is full of air when it is new. Full line pressure rushing into it compresses that air and surges up through the resin bed, which can lift the bed and carry resin beads out through the drain. Water-Right's manual warns that if water flows too rapidly there will be a loss of media to the drain.
How long does it take to purge air from a new water softener?
Usually a few minutes in the backwash position, but the finish line is what you see, not a time. Keep the inlet barely open until the drain line runs a steady, solid stream with no sputtering or spitting. Then open the inlet the rest of the way slowly and keep backwashing until the drain water runs clear.
Is it normal for water to be cloudy or discolored after installing a softener?
A short period of cloudy water from trapped air, or colored water from fines and disturbed pipe scale, is common right after installation. It should clear after the fines flush and after running a cold tap without an aerator for a few minutes. Color that persists for days points to the house piping or a fault, not to startup.
Should I regenerate a new water softener right away?
Yes. Run one full manual regeneration once the unit is leak tested and salted. It proves that the valve can draw brine, refill the brine tank and send water to the drain through every cycle, and it sets the brine tank to the valve's programmed refill amount. Watch it once rather than finding a fault at 2 a.m.
Do you put salt in a water softener before starting it?
Most manuals have you start with only a little water in the brine tank and add salt later in the procedure, once the brine draw has been checked. Water-Right, for example, has the installer add about three inches of water by hand before startup and load the salt during the rinse step. Follow your own manual's order.
