
How to Clean a Water Softener Injector and Venturi
To clean a water softener injector, put the softener in bypass, relieve the pressure, remove the injector cap, and take out the screen, nozzle and throat. Soak them in white vinegar, rinse, and blow the holes clear with air, never a pin. Refit every part in its original port with fresh silicone grease on the O-rings, then run a regeneration to confirm the brine level falls.
It takes about twenty minutes. The cleaning is easy. What usually goes wrong is the reassembly, so most of this guide is about that, and about what the debris tells you.
Before You Clean the Water Softener Injector: Confirm It Is the Fault
A plugged injector produces one clear sign: the valve regenerates but the brine tank level does not drop. Before you take anything apart, make sure that is what you have.
- Start a manual regeneration. If you are unsure how on your valve, the button sequences are in how to manually regenerate a water softener.
- Let it pass backwash and reach brine draw. Mark the water level inside the brine tank with tape or a marker.
- Check the level after fifteen to twenty minutes. A working injector lowers it by several inches. A plugged one leaves it where it was.
- Put your hand on the brine line. During a normal draw you can often feel a slight pulse and hear a faint hiss at the valve end. If you feel nothing at all, suspect the injector or the drain.
Rule out three things that look the same:
- The drain line. The injector needs free flow to the drain to create suction. Clack's WS1 service manual lists drain line restriction and a drain line "too long or too high" among the reasons a valve fails to draw regenerant. Unkink it before you open the valve.
- An air leak in the brine line. Bubbles in the tube during brine draw mean the injector is pulling air through a loose fitting instead of brine.
- Low pressure. Clack's troubleshooting table says pressure "must remain at minimum of 25 psi" for a good draw. Pentair's Fleck 5600SXT manual gives 20 psi as the minimum for the valve to regenerate properly.
If the valve never moves at all, the injector is not your problem. The full diagnosis, including salt bridges and brine well blockages, is in why a water softener is not using salt.
What You Need
- A flat-blade screwdriver and, for Fleck valves, a nut driver or screwdriver for the two injector body screws
- A small cup of plain white vinegar
- A soft toothbrush and a bowl of clean water
- Compressed air (a bike pump or canned air works) or a plain round wooden toothpick
- Silicone O-ring grease. Not petroleum jelly, not WD-40, not spray lubricant (see the reassembly section)
- A towel, a small tray to lay parts out in order, and your phone to photograph each layer as it comes out
A replacement O-ring set for your valve is worth having on hand. Old O-rings flatten, and the cap O-ring is the one that decides whether the injector can pull suction at all.
The Teardown by Valve Family
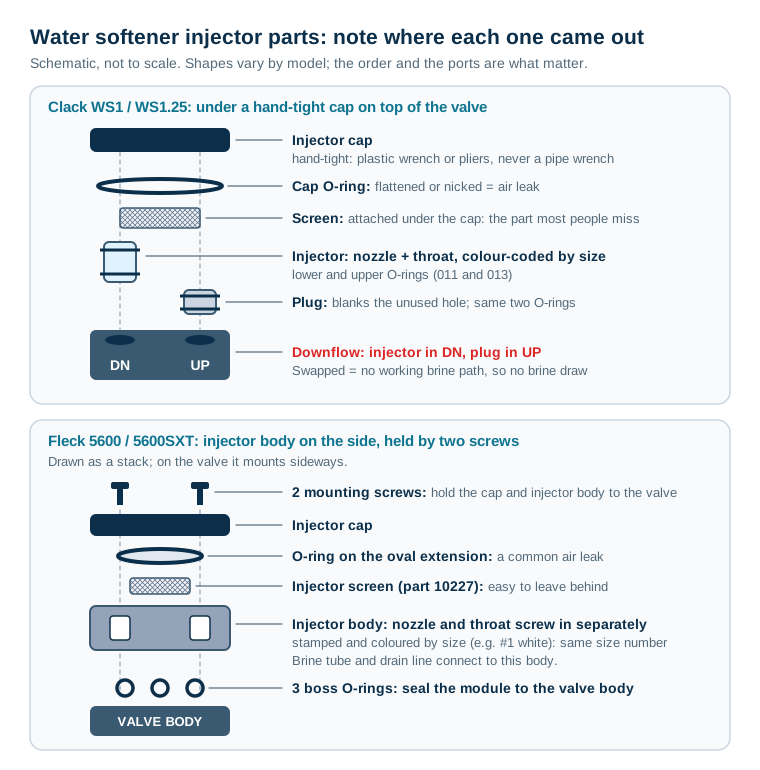
Every softener injector is two precision pieces, a nozzle and a throat, with a screen upstream to stop debris reaching them. Where they sit and how they come out depends on the valve. If you are not sure which valve you have, the model is usually printed on the cover or a label on the valve body.
Step 1 (all valves): Bypass and depressurise
Put the softener in bypass and unplug the control. Then relieve the pressure inside. Pentair's Fleck 5600SXT service manual says to do this by stepping the control into the Backwash position momentarily and then returning it to service. On other valves, opening a softened cold tap until flow stops does the same job. Opening an injector cap on a pressurised valve sprays water everywhere and can blow the small parts out.
Clack WS1 and WS1.25: parts under a hand-tight cap on top
| Layer (top down) | What it is | What to watch for |
|---|---|---|
| Injector cap | Hand-tight screw cap on top of the valve | Clack says loosen with its plastic wrench or pliers if needed. No pipe wrench |
| Cap O-ring | Large O-ring sealing the cap | Flattened or nicked = air leak |
| Screen | Attached to the underside of the cap | The part most people miss. It comes out with the cap, so it gets overlooked |
| Two holes marked DN and UP | One holds the injector, the other holds a plug | Note which hole the injector came from before you pull anything |
| Injector | Nozzle and throat assembly, colour-coded by size | Pry out gently with a small screwdriver |
| Plug | Blank that blocks the unused hole | Wipe clean. Clack says replace the whole plug if it leaks |
The manual notes the injector and the plug each carry a small lower and upper O-ring (an 011 and an 013). Check both.
Fleck 5600 and 5600SXT: injector body on the side, held by two screws
| Layer | What it is | What to watch for |
|---|---|---|
| Brine tube and drain line | Disconnect at the injector body | Note which is which |
| Two mounting screws | Hold the injector cap and injector body to the valve | Once out, the injector and brine module lift away together |
| Injector cap | Carries an O-ring around an oval extension | This O-ring is a common air-leak point |
| Injector screen | Fleck part 10227 in the 5600SXT parts list | Easy to leave in the body and forget |
| Nozzle and throat | Screw into the injector body separately | Each is stamped and coloured by size (for example #1, white) |
| Three small O-rings | Sit over three bosses on the injector body | Seal the module to the valve body |
Fleck's instructions unscrew the nozzle and throat from the injector body. Keep them apart and labelled: they are different parts, they go into different ports, and they must be the same size number.
Retail cabinet softeners: a separate nozzle and venturi housing
Many all-in-one cabinet units sold at home stores put the nozzle and venturi in a housing on the side of the valve head. The makers' support pages describe removing a cap and then a stack of small parts: a screen, one or more flow plugs, a flat gasket and the nozzle and venturi pieces. Lay them out in a line in the order they came out and photograph the line. That stack only works in one order.
Cleaning the Nozzle, Throat and Screen Without Ruining Them
- Rinse everything under the tap first. Loose sediment and salt fines wash out on their own.
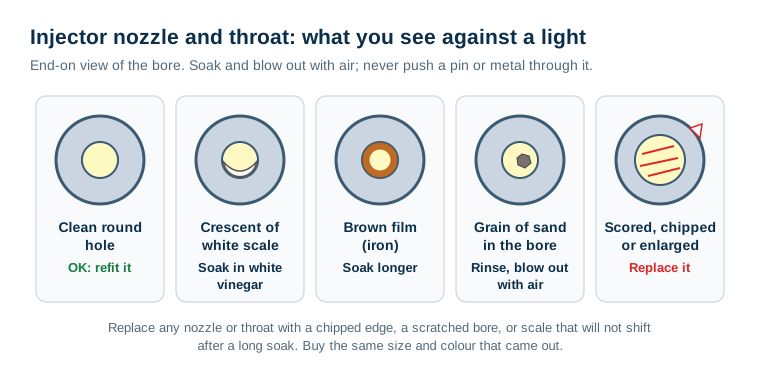
- Look through the nozzle and throat against a light. You should see a clean round hole in each. A crescent of white scale, a brown film or a grain of sand sitting in the bore is your fault.
- Soak in white vinegar. Clack's manual names vinegar or sodium bisulfite for chemically cleaning the injector, pistons and flow controls. Give scale fifteen to thirty minutes. Iron staining often needs longer.
- Brush the screen with a soft toothbrush from the clean side outward, so trapped debris is pushed out rather than deeper in.
- Blow the holes clear with air. Clack says the holes "can be blown out with air."
- Do not ream the orifice. Clack warns that sharp objects can score the plastic, and that "scoring the injector or increasing the diameter of the hole could change the operating parameters of the injector." Some retail guides suggest a paper clip or pin. On a precision nozzle that is how a free fix becomes a parts order. If something is stuck, soak longer, or nudge it with a round wooden toothpick. Never push metal through the hole.
- Inspect the O-rings. Anything flattened square, cracked or nicked gets replaced. On a Fleck, the manual's own procedure discards the cap O-ring and the three boss O-rings and fits new ones every time.
When to replace instead of clean. A nozzle or throat with a chipped edge, a scratched bore, or scale that will not shift after a long soak should be replaced. They are cheap parts sold individually on common valves. Buy the same size and colour that came out.
What the Debris Is Telling You
Don't rinse the debris away before you look at it. What blocked the injector tells you whether cleaning it is a one-off or the start of a routine.
| What you find | Likely source | What it means |
|---|---|---|
| White or grey grit in the screen and nozzle; partly dissolves in water | Insoluble residue from salt, carried in with the brine | Your salt is leaving residue. Lower-purity salts leave more. If the brine tank floor is also sludgy, clean it and consider a higher-purity salt. See salt mushing in the brine tank and why softener salt looks brown or dirty |
| Hard white crust that fizzes or softens in vinegar | Hardness scale | Common where the injector sees raw water. Vinegar fixes it. Recurs slowly |
| Orange, brown or black slime or staining | Iron (sometimes manganese) | Iron is fouling the valve, not just the injector. Fleck's manual lists "iron buildup in water conditioner" and says to clean the control and add mineral cleaner. Read can a water softener remove iron before this becomes monthly |
| Sand, silt or fine grit that does not dissolve at all | Sediment from the supply, often a well | The softener is acting as your sediment filter. A sediment prefilter before the softener protects the injector and the seals |
| Shreds of PTFE tape, solder beads, pipe flakes | Recent plumbing work | Fleck's manual names "foreign material broken loose from pipes by recent work done on plumbing system" as a cause. Usually a one-off once flushed |
| Almost nothing | Injector was not the fault | Look again at the drain line, brine line fittings and pressure |
If the debris is iron or sediment, the injector is only the first part to show it. The same material is working its way into the piston seals, which is why a valve that plugs its injector every few months often needs a seal and spacer service next.
Reassembly: 7 Mistakes That Bring the Fault Back
A cleaned injector that goes back in wrong fails the first time it is used. These are the mistakes that cause it.
1. Injector in the wrong hole (Clack). Clack valves have two holes under the cap, marked DN and UP. The manual's compliance table says a downflow softener takes the injector in DN and the plug in UP. Swap them and there is no working brine path, so the softener goes back to drawing nothing. Upflow bodies are the exception and have the DN marking removed. Put the injector back where it came out.
2. Nozzle and throat mixed up or mismatched (Fleck). They are separate parts in separate ports. Fleck lists them as matched pairs by tank size, from #000 brown for a 6-inch tank to #4 green for a 14-inch tank. A nozzle from one size paired with a throat from another will draw poorly.
3. Screen left out or seated crooked. Without it, the next grain of debris goes straight into the nozzle. Crooked, it lets debris bypass the mesh.
4. Pinched or dry cap O-ring. The injector works by suction. A cap O-ring that is rolled out of its groove lets the injector draw air instead of brine, so it looks like the clog never cleared.
5. Stack out of order (cabinet units). Follow your photo. A gasket or flow plug installed upside down either blocks the flow or leaks.
6. The wrong lubricant. Fleck's instructions call for silicone lubricant on each new O-ring. Clack's warning is blunter: hydrocarbon lubricants such as petroleum jelly and WD-40 "will damage components that contain o-rings and/or plastic," and it advises against spray silicone too. A thin film of silicone grease is all you need.
7. Over-tightening. Clack's caps are designed to be hand-tightened. On a Fleck, tighten the two screws snugly and evenly. Cracking the cap turns a free repair into a leak, the kind covered in why a water softener leaks at the control head.
Proving the Repair Worked
- Return to service slowly by easing the bypass open, and check the injector area for drips. Fleck also says to check the drain seal with the control in the Backwash position.
- Plug in and reset the time if the control lost it.
- Run a manual regeneration and repeat the level test. Mark the brine level at the start of brine draw and check it fifteen to twenty minutes later. It should drop by several inches.
- Test a cold softened tap after the cycle finishes. Resin that went several cycles without brine may need one or two full regenerations before hardness reads zero.
If the level still does not fall with a clean, correctly installed injector, the fault has moved inside the valve. Candidates are the brine valve or regenerant piston and the seals around it. Clack's manual lists a faulty regenerant piston among its no-draw causes. That job is covered in servicing a water softener control valve.
What Cleaning Cannot Fix
- A wrong-size injector. If someone fitted the wrong size, cleaning restores the wrong draw rate. How size relates to tank diameter is explained in what a water softener injector and venturi actually do.
- Pressure below the valve's minimum. No injector draws well on a weak supply.
- An upstream problem that keeps sending debris. Iron and sediment will clog a clean injector again. Deal with the source.
Cleaning a water softener injector is the cheapest repair on the whole system, and it fixes a large share of "not using salt" faults. Do it gently, put everything back exactly where it came from, and read the debris before you rinse it away.
Frequently Asked Questions
How do I know if my water softener injector is clogged?
Start a manual regeneration and watch the brine tank during the brine draw stage. If the valve is clearly running, water is going to the drain, and the brine level does not fall, the injector or its screen is the first thing to check. Fleck's and Clack's service manuals both list a plugged injector among the causes of a softener failing to draw brine, alongside a restricted drain line, an air leak in the brine line and low water pressure, so rule those out too.
Can I use vinegar to clean a water softener injector?
Yes. Clack's WS1 service manual says to chemically clean the injector with vinegar or sodium bisulfite, and that the holes can be blown out with air. Soak the nozzle, throat and screen until the scale softens, then rinse with clean water. Vinegar dissolves hardness scale and loosens iron staining; it will not dissolve sand or pipe debris, which you flush or brush out.
Can I use a pin or paper clip to clean the injector hole?
Avoid it on the nozzle and throat. Clack's manual warns that sharp objects can score the plastic and that scoring the injector or increasing the diameter of the hole could change how the injector performs. The orifice size sets the brine draw rate, so a slightly enlarged hole can leave you with a softener that draws but regenerates poorly. Soak, then use a soft brush, a blast of air or a round wooden toothpick only to lift loose debris, not to ream the hole.
How often should a water softener injector be cleaned?
There is no universal interval. Many retail softener makers suggest checking the nozzle and venturi about once a year, and more often on well water or iron-bearing water. A better trigger than the calendar is evidence: if a manual regeneration shows the brine level falling slowly or not at all, or you found heavy debris the last time you opened it, shorten the interval.
Why is my softener still not drawing brine after cleaning the injector?
Check the parts around it. A kinked or raised drain line creates back pressure that stops the suction, a loose brine line fitting lets the injector draw air, a salt bridge or sludge can block the brine well, and inlet pressure below the valve's minimum weakens the draw. If the injector was refitted in the wrong port or with a pinched O-ring, it can also fail immediately. If all of those check out, the fault is inside the valve, usually a seal or the brine piston.
