
Where Should a Whole-House Water Softener Be Installed?
The answer to where to install a water softener is five requirements, and one spot has to meet all of them. It must be on the main line after the shutoff and before the water heater and every house branch. It needs a drain for regeneration water and a power outlet. The spot must never freeze or sit in direct sun, and you need room to lift the brine lid and reach the bypass.
Most homes have one or two spots that come close. This page shows you how to test them against the five requirements. You will also see how the requirements play out in four common house layouts, and which compromises you can live with. One of them, the outdoor tap branch, has to be decided before the pipes go in. For a well, the order around the pressure tank has its own page: where to install a softener on a well water system.
Where to Install a Water Softener: The Five Requirements
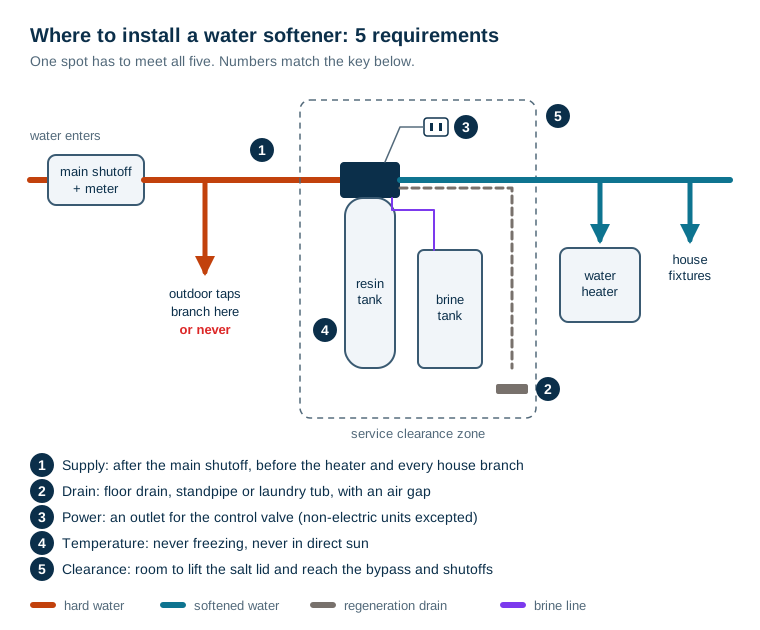
Manufacturer manuals list the same requirements in slightly different words. GE Appliances' location guidance is typical. It says to install the softener "between the water inlet and the water heater" and "upstream of (before) any other plumbing connections except outside water pipes." It also asks for a nearby drain with an air gap and a spot that never drops below freezing. It warns against direct sunlight because "excessive heat from the sun may cause distortion or other damage to non-metallic parts." And the softener must not block access to the water heater or the main shutoff.
Take each requirement in turn.
1. Supply position: after the shutoff, before everything else
The softener treats only the water that passes through it. Any pipe that tees off the main before the softener stays hard, whatever the softener does. So the spot on the main where the softener connects matters more than which room it is in.
- City water: after the main shutoff and meter, and after a pressure-reducing valve if you have one.
- Well water: after the pressure tank and any iron or sediment stage. Never between the pump and the pressure tank.
- Before the water heater, always. The heater is where hardness does the most expensive damage. The one-line reason and the diagnostic for homes that have it wrong are in should a softener go before or after the water heater.
- Not too close to the heater. The Watts PWSR softener manual says to place the softener "at least 10 feet away from hot water heater to protect against hot water back-up." Hot water pushed back into a softener can damage the valve and resin. On a short run, a check valve on the heater's cold inlet is the usual fix.
2. Drain access
Every regeneration sends backwash and rinse water to a drain. A floor drain, a laundry standpipe, a utility sink or a sump all work. Whichever you use, leave an air gap: GE specifies 1-1/2 inches between the end of the hose and the drain. Watts adds that a drain line longer than 20 feet should be 3/4 inch. Drain lines can run uphill a limited distance, but every foot of height and length adds back pressure. A spot where the drain line is short and runs downhill is better than one that needs a long uphill run. The acceptable drain types, and the ones that are not, are covered in where can a water softener drain. Fittings, air gaps and routing are in how to connect water softener drain tubing, and the options when no drain or outlet is in reach are in installing a softener without a drain or outlet nearby.
3. Power
Electronic control valves need a standard outlet within reach of the plug-in transformer. The outlet should not be switched with a light or run through a timer. A clock valve that loses power drifts, and a metered valve may stop counting. Non-electric twin-tank units skip this requirement. Nothing else does.
4. Temperature
This one decides the location in many homes. The Watts PWSR manual gives an operating range of 40°F to 110°F for both room and water temperature, and says damage from freezing "will void this water conditioning systems warranty." A single hard freeze can crack a valve body. A long summer in a hot, sunny spot warps plastic and ages the electronics. An interior room, a basement or a heated garage passes. An unheated garage in a cold state, or a sunny wall outside, needs protecting before it does. Outdoor water softener installation covers the freeze and heat protection that works.
5. Service clearance and salt access
You will lift a 40-pound bag of salt over the brine tank several times a year. You will also need to reach the bypass, the shutoffs and the drain connection when something goes wrong, and the bypass needs exercising and testing now and then. So leave room above the brine tank for the lid and a bag of salt, room in front of the control valve, and a clear path to carry the salt in. Measured footprints and clearances are in how much space a water softener needs. Watts adds one more point that many people miss: install the softener "in a place where water damage is least likely to occur if a leak develops."
The Outdoor Tap Decision You Only Get to Make Once
Outdoor taps are the one branch you usually want before the softener. Lawn watering uses large volumes of water that gain nothing from softening. Each of those gallons uses up grain capacity and, eventually, salt. Watts says to "keep outside faucets on hard water to save soft water and salt." Penn State Extension agrees that outside spigots, toilets and basement sinks "can be bypassed," while showers, sinks and laundry should be softened. The case for each outdoor use is in should outdoor faucets bypass a water softener.
The catch is timing. Whether the outdoor taps can stay hard depends on where their pipe leaves the main. In many houses the hose bib lines come off a pipe that also feeds a bathroom or the kitchen. Splitting them after the fact means opening walls or ceilings. So decide at installation:
| Situation | What to do |
|---|---|
| Outdoor taps already tee off before the chosen spot | Install as planned. They stay hard |
| Outdoor taps share a branch with indoor fixtures | Either re-pipe the hose bibs to the hard side now, or accept softened water outside and size for it |
| Irrigation system on the house supply | Tee it off before the softener. Softening irrigation water only adds sodium to your soil |
| You want soft water at one outdoor tap, for washing a car | Run a separate line from the soft side to that tap |
If the outdoor taps end up on softened water, add their use to your daily gallons when you size the softener. A summer of watering can add more to the load than the whole house uses indoors.
Two related branches are worth deciding at the same time. A kitchen drinking water tap on unsoftened water needs its own line from the hard side. That line is far easier to run while the main is open; whether you want one is covered in should a kitchen drinking tap bypass the softener. A fire sprinkler feed, if your house has one, follows the sprinkler designer's and local code requirements, not the softener installer's. Confirm where it connects before choosing the tie-in point.
Checking a Spot Before You Buy
Before you order a softener, stand in the spot you have chosen and confirm each requirement with a tape measure and a flashlight:
- Trace the main from the entry to this spot. Is there any tee between them? If so, where does that branch go?
- Find the drain. How far away is it, and is its inlet higher than the valve?
- Find the outlet. Is it switched, or on a circuit that trips often?
- Check the lowest temperature this spot reaches in winter, and whether sun reaches it in summer.
- Measure the height above the brine tank position and the path for carrying salt in.
If all five answers are good, the location is settled. If one fails, the rest of this page shows which failures you can work around.
Applied to Four Real House Layouts
The five requirements work out differently depending on where the main enters and where the heater sits. These are the four layouts that cover most US homes:
| Layout | Where the main usually enters | Best softener spot | Acceptable compromise | Compromise that causes trouble |
|---|---|---|---|---|
| Full basement | Through the foundation wall, often near the front | Beside the main entry, near the floor drain or laundry | Moving it a few feet along the main to reach a drain | Moving it past the tee that feeds the upstairs, or into an unheated corner |
| Slab with attached garage (common in the South and West) | Rises in the garage wall, often beside the water heater | In the garage, between the entry and the heater | An unheated garage in a mild climate, with the valve kept out of sun | An unheated garage where winter lows fall below freezing, with no protection |
| Crawl space with utility closet | Enters the crawl space, then rises into a closet or laundry room | In the closet or laundry room where the main comes up | Re-routing the main a short way to reach a laundry standpipe | Putting the softener in the crawl space itself, where nobody will carry salt |
| Well house or pump room | From the pressure tank in an outbuilding or basement | Indoors, after the pressure tank and filters | An insulated, heated well house with a drain | An unheated well house where the pump alone keeps the room above freezing |
Two patterns hold across all four. The best spot is nearly always where the main enters, or where it rises, because that is the only point certain to be ahead of every branch. And the most common installation fault is moving the softener away from that point to reach an outlet or a drain. The softener then ends up downstream of a tee, and part of the house stays hard. For the full breakdown by room, see softener in a basement, garage, crawl space or closet.
Compromises You Can Live With, and Ones You Cannot
Almost no house meets all five requirements perfectly. Some compromises cost you a little. Others cost you a repair.
Compromises that are fine:
- A drain line that runs uphill a moderate distance, within the height and length the valve manual allows.
- An extension of the transformer's low-voltage cord to reach an outlet. Most manuals allow this with the right wire gauge.
- A long pipe run from the entry to the softener, as long as nothing tees off it except hard-water branches you chose.
- A mild-climate garage. It is fine as long as the valve is shaded and a rare cold snap can be handled with an insulated cover and heat.
- A tight closet, if the brine tank can slide out for filling.
Compromises that cause problems later:
- Any spot downstream of a house branch. The branch stays hard for good. This and the other faults installers repeat are listed in common water softener installation mistakes.
- Any spot that can freeze without protection. One cold night cracks the valve or tank, and freeze damage is usually outside the warranty.
- Direct sun on the control valve or brine tank. Plastic warps and the electronics age.
- A brine tank you cannot reach with a bag of salt. It will run empty, and hard water will come back unnoticed.
- A drain line that is too long or too high for the valve's drain flow. Backwash is then weak, and the resin bed slowly fouls.
- A short direct pipe from the heater outlet side, with no check valve, where hot water can back up.
What the Right Location Cannot Fix
Location only lets the softener do its job. A well-placed unit that is undersized will still run out before regeneration. A softener in the right spot still does not remove bacteria, lead, nitrate or sulfide, and does not correct acidic water. Iron beyond what the resin can handle needs its own filter upstream (see should a water filter go before or after a softener). Before choosing a spot, test the water. Size the unit from the results, and check that the chosen location has room for any pretreatment stage the test calls for. That stage usually sits right beside the softener.
Related Installation and Setup Guides
Homes with a special constraint
- Water softeners in condos, apartments and HOA properties: shared mains, no drain, and permission.
- Water softeners in mobile, manufactured and tiny homes: skirting, freezing and small footprints.
- One softener for multiple units and water softeners in rental properties: duplexes, landlords and tenants.
- Water softener planning for new construction and during a remodel: getting a loop in while the walls are open.
- Installing a softener in an older home with galvanized pipe: what to replace at the tie-in.
Installing and starting up
- How to install a whole-house water softener: the full sequence, start to finish.
- Connecting a softener to copper, PEX, CPVC and push-fit: fittings for each pipe type.
- How to confirm flow direction at a softener loop: avoiding a reversed inlet and outlet.
- Water softener startup procedure and how to set hardness on the control valve: first fill and first programming.
- No water after installing a softener: the emergency checks if the taps go dry.
Regeneration and salt settings
- How water softener regeneration works, how often it should run, how long it takes and how much water it uses.
- Can you use water during regeneration? and what time a softener should regenerate.
- How to set capacity and reserve, how to set the salt dose and how to optimize for salt and water efficiency.
- How much salt a softener uses, salt types compared, potassium chloride vs sodium chloride and storing, changing and disposing of softener salt.
Frequently Asked Questions
Where is the best place to install a water softener?
On the main water line close to where it enters the house, after the main shutoff and meter (or the pressure tank on a well), and before the water heater and any branch that feeds the house. The spot also needs a drain for regeneration water, a power outlet, temperatures that never freeze, no direct sun, and enough room to lift the brine tank lid and reach the bypass.
Does a water softener have to be near the water heater?
It has to be upstream of the water heater, not necessarily near it. Some manufacturers ask for distance: the Watts PWSR manual says to locate the softener at least 10 feet from the water heater so hot water cannot back up into it. A short, direct pipe between heater and softener is the arrangement to avoid.
Can a water softener be installed far from where water enters the house?
Yes, if no branch leaves the main between the entry and the softener except the ones you want to stay hard, such as outdoor taps. Every branch that tees off before the softener stays unsoftened, so the farther the softener is from the entry, the more likely a bathroom or the water heater ends up on hard water.
Should outdoor faucets be on softened water?
Usually not. Lawn and garden watering uses a lot of water and gains nothing from softening, so most manuals and extension services recommend branching outdoor taps off before the softener. That branch has to be planned at installation, because re-piping it later often means opening walls.
Does a water softener need a floor drain?
It needs a drain of some kind: a floor drain, a laundry standpipe, a utility sink or a sump, with an air gap between the drain line and the drain. It does not have to be a floor drain, but without any drain within reach the location does not work.
Can a water softener be installed in a garage?
Yes, if the garage never freezes and the unit is out of direct sun. Many softeners in warm states sit in garages. In cold climates an unheated garage risks a cracked valve or tank, and manufacturers generally exclude freeze damage from the warranty.
